
User guide, version 1.7.4
How to use Questionnaire Autopilot.
Each section below covers one task. The steps come first, followed by a short video of the same steps in the app. The videos use Examplify Inc., a fictional company whose sample files are included with the app, so you can follow along before using your own files.
The videos have no sound. Windows that belong to your operating system, such as the file picker, are not shown in the videos: where a file is chosen, the video shows it appearing in the app.
Getting started
Install and uninstall
Your download is one ZIP named for your computer, for example QuestionnaireAutopilot-1.7.4-Windows-x64.zip. It contains the installer, a START HERE guide, these guides as files, the command line version and a checksum list.
Windows 10 and 11
- Open the ZIP and double-click
QuestionnaireAutopilot-Setup-1.7.4.exe. - If Windows shows "Windows protected your PC", click More info, then Run anyway. This appears once because the installer is not yet code-signed.
- Keep the suggested folder and click Next. The app installs for your user account only and does not need administrator rights.
- Tick Create a desktop shortcut if you want one and click Next, then click Install.
- Click Finish. The app opens. Later, open it from the Start menu or the desktop shortcut.
- To uninstall, open Settings, then Apps, find Questionnaire Autopilot and choose Uninstall.
Linux
- On Ubuntu, Debian and similar systems, double-click the
.debfile and click Install in the Software or App Center. Uninstall it from the same place. - On other systems, right-click the
.AppImagefile, choose Properties, then Permissions, and allow it to run as a program. Double-click it to start. Delete the file to uninstall. - On Linux the app opens in your web browser. It still runs only on your computer.
macOS
- Open the ZIP if your Mac has not already, so you see Questionnaire Autopilot.app. It runs on Apple silicon and Intel Macs with macOS 11 or later.
- Drag Questionnaire Autopilot onto the Applications folder in Finder, then double-click it in Applications.
- The first time, macOS says it cannot check the app. Click Done, open System Settings, then Privacy and Security, scroll down and click Open Anyway next to Questionnaire Autopilot. Confirm with your password. macOS asks only once.
- To uninstall, drag Questionnaire Autopilot from Applications to the Trash.
Your settings are kept when you uninstall. To remove them too, delete the folder %APPDATA%\Questionnaire Autopilot on Windows, ~/Library/Application Support/Questionnaire Autopilot on macOS or ~/.config/Questionnaire Autopilot on Linux.
Free trial
The free trial download is the same app. When it first opens, click Start free trial on the activation screen. Every feature works for 14 days on that computer, with no card and no account.
- Click Start free trial. The app opens on the Overview page.
- The top right shows Free trial and the time left, for example 9 days left, and on the last day the hours left. Click it to enter a license key at any time.
- To keep going after the trial, buy a license, then paste the key from the receipt into the License window or the activation screen. Everything you made stays exactly as it is.
When the trial ends, the app opens only on the activation screen until a license key is entered. Your work stays on the computer. If you decide not to buy, open Not buying? Remove your work from this computer on that screen to delete it; on Windows, uninstalling the app after the trial asks the same question first. A trial runs once per computer: removing the app or its data does not start a new one.
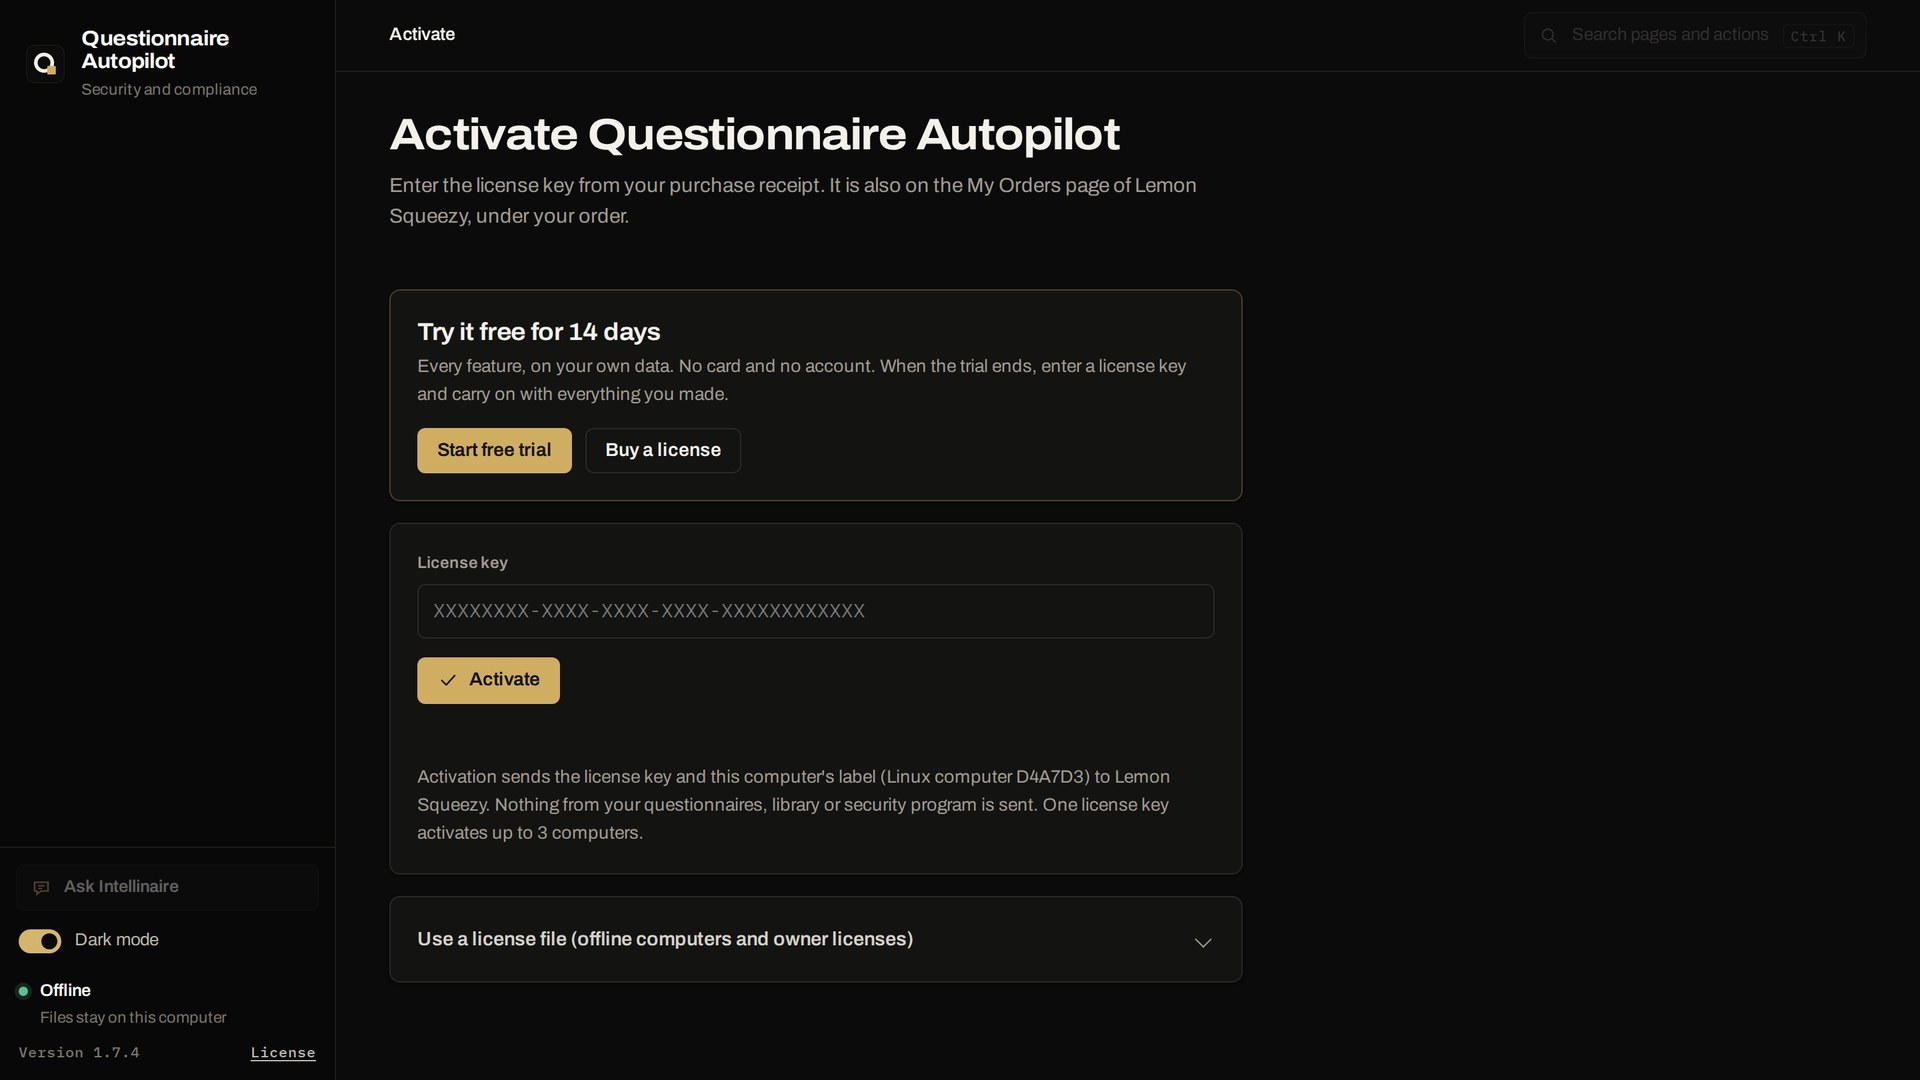
Activate your license
The first time the app opens, it asks for your license key, or offers the free trial. The key is in your purchase receipt email and on the My Orders page of Lemon Squeezy, under your order. One key activates up to three computers.
- Copy the license key from the receipt.
- Paste it into License key and click Activate. The computer must be online for this step.
- The app opens on the Overview page. The top right shows your license and its devices, for example Devices 1/3; the bottom of the menu shows the version and a License link.
Activation sends only the license key and a label for the computer, such as “Windows computer 3F2A9C”, to Lemon Squeezy. Your questionnaires, library and files are never sent. While the computer is online, the app confirms the license at most once a week. Without internet, it keeps working for 30 days after the last confirmation.
The License window (click License at the bottom of the menu, or the devices button at the top right) shows Devices: how many computers the key is active on out of its limit, for example 2/3, refreshed from Lemon Squeezy each time the window opens.
Move the license to another computer
- On the old computer, click License at the bottom of the menu.
- Click Deactivate this computer, then click it again to confirm.
- Activate the new computer with the same key.
If a computer was replaced or lost before you could deactivate it, email contactprautof@gmail.com with your order number. For computers without internet access, the email can ask for an offline license file: include the computer code shown under Use a license file on the activation screen. When the file arrives, open Use a license file again and drop the file on the box, or click Choose file. A license file works only on the computer it was issued for.
First run and the sample company
The Workspace page, under Questionnaires in the menu, is where questionnaire work starts. The menu on the left lists every task, grouped by area.
- Open Questionnaire Autopilot.
- Click Start with the sample company. The app answers a 40 question sample questionnaire for Examplify Inc., a fictional company, using its sample library.
- Wait for the run to finish. The summary shows how many questions have a proposed answer and how many need a person.
- Click Review answers to look through the results. See Review and edit answers.
Appearance and quick actions
- Use the Dark mode switch at the bottom of the menu to change between dark and light. The app remembers your choice.
- Press Ctrl and K (Command and K on a Mac), or click the search box at the top of the window, to open the quick action list.
- Type part of a task name, for example "health", and press Enter to open it. Use the arrow keys to move through the list and Esc to close it.
Security program
The security program pages track your readiness for each framework, your safeguards, policies, risks, vendors and incidents. Everything is stored on your computer, in the app's settings folder.
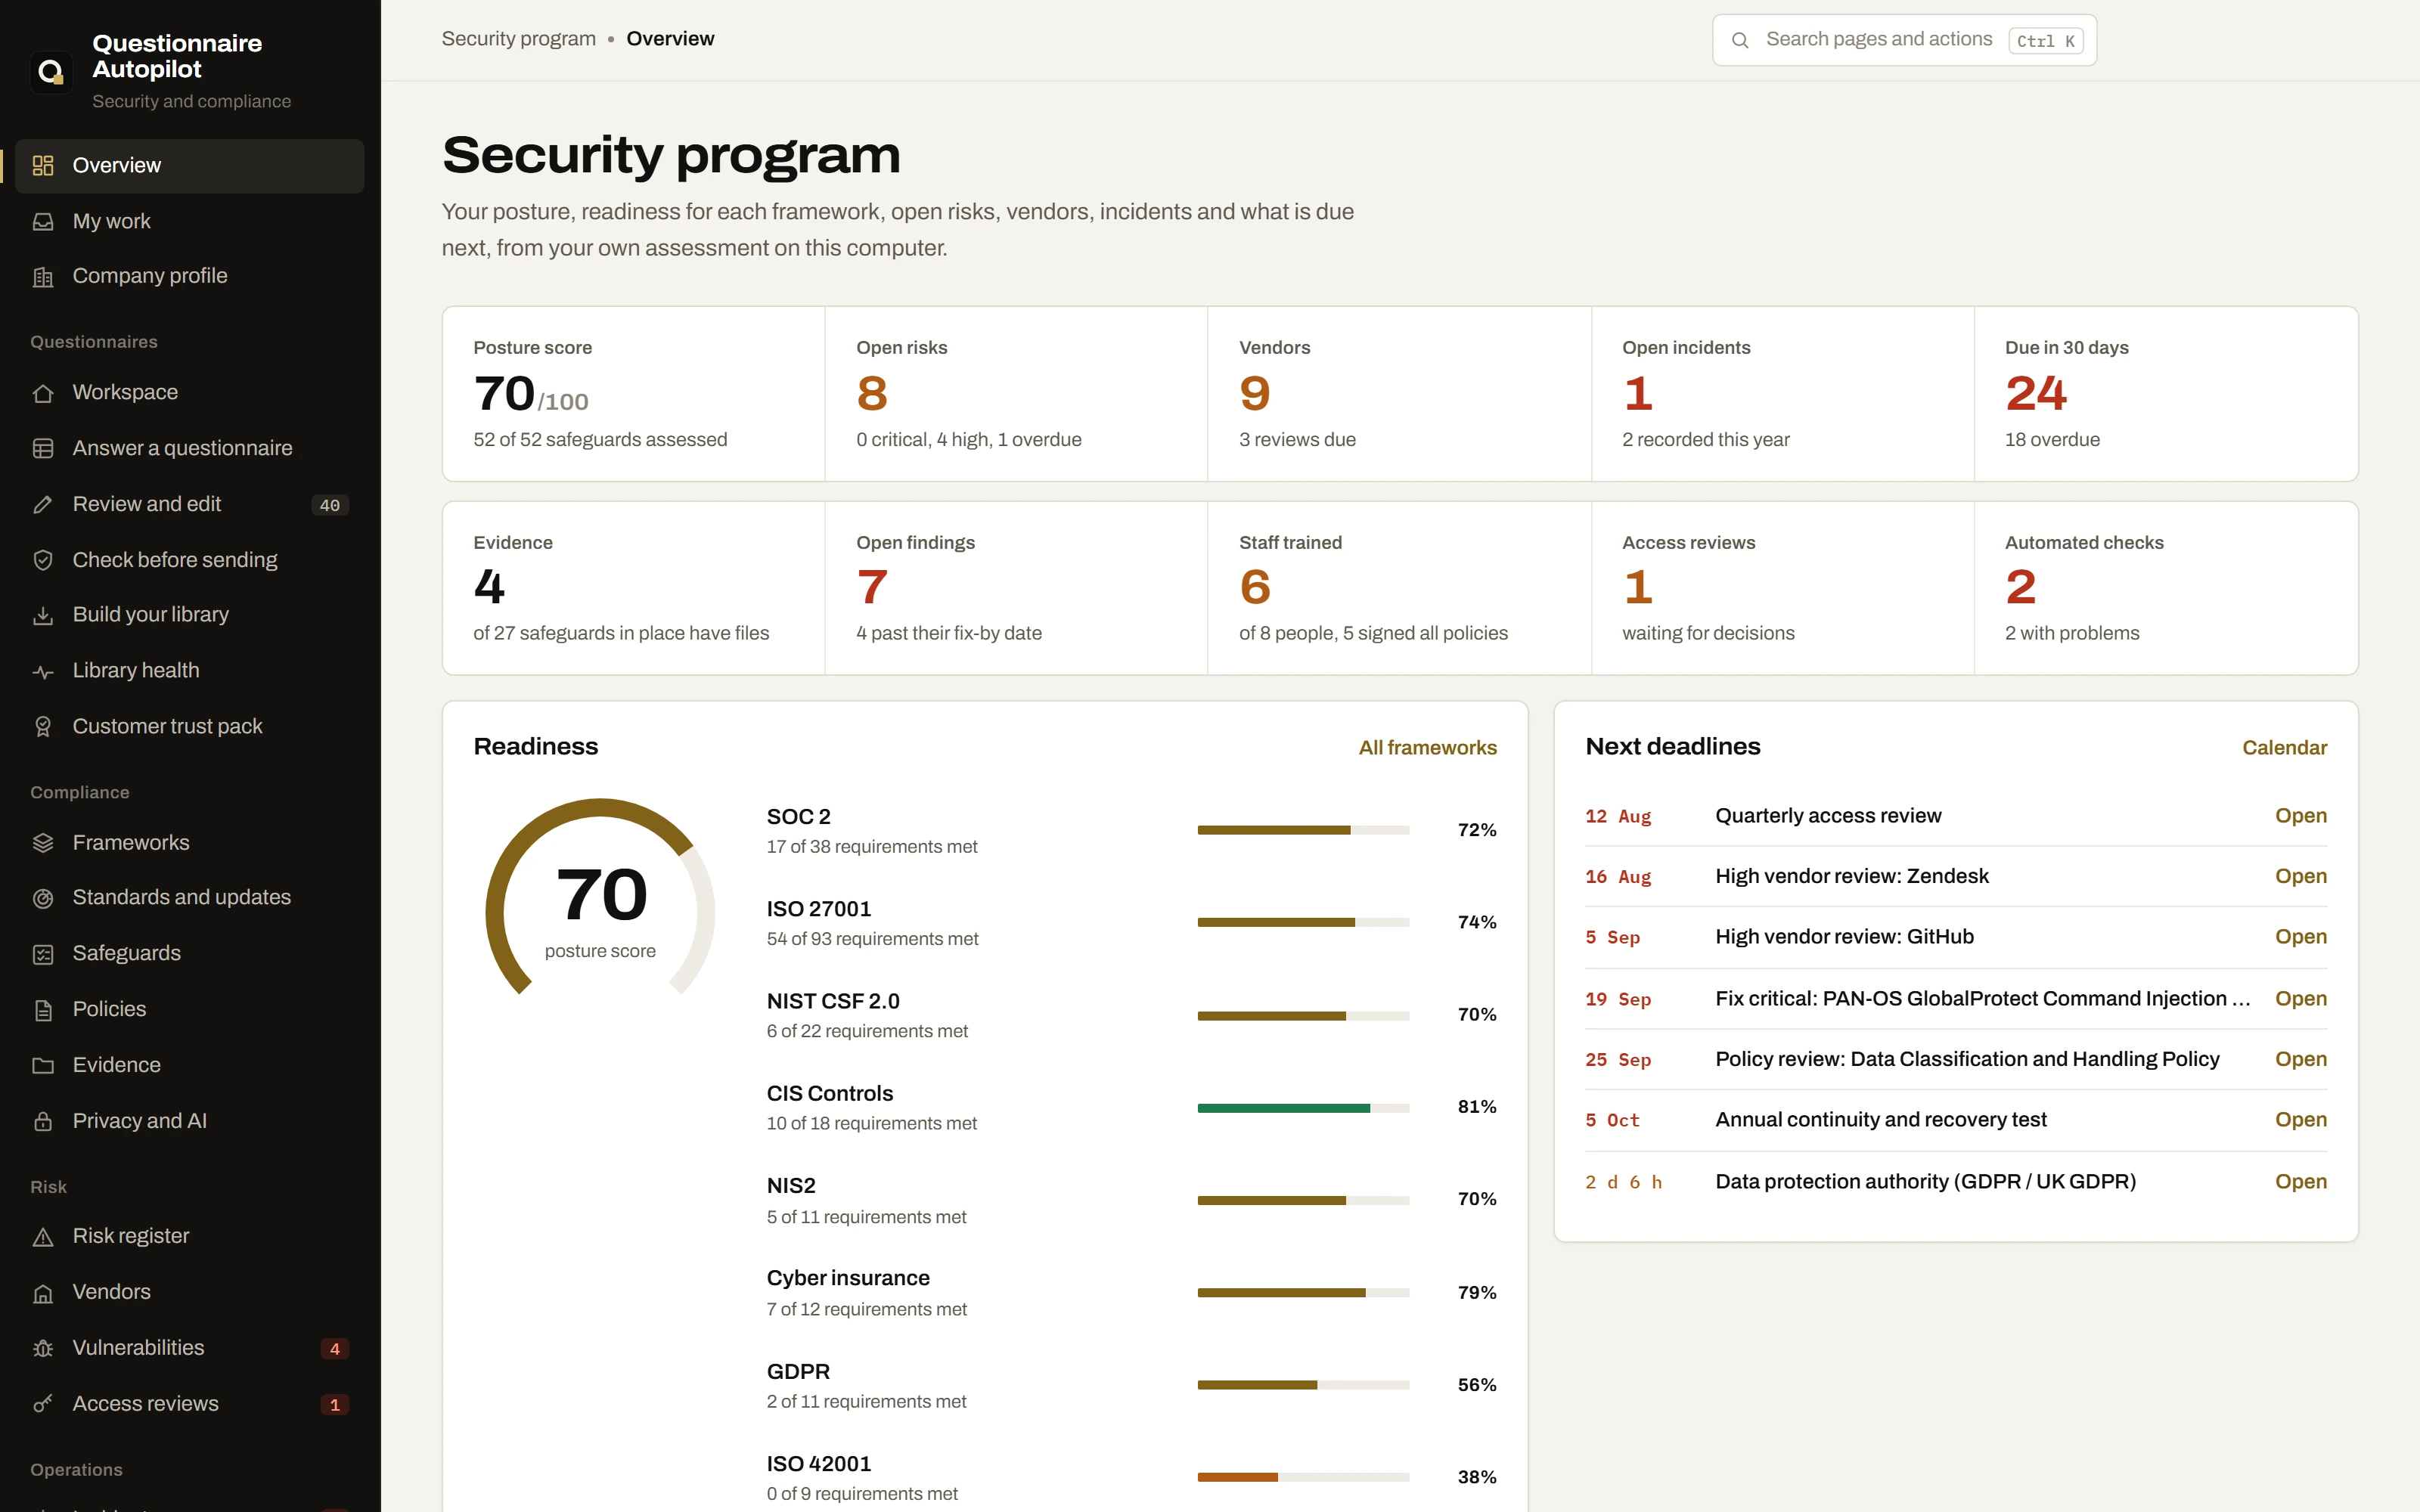
The security program overview
Overview is the first page of the app. It shows your posture score out of 100, readiness for each framework you track, open risks, vendors due for review, open incidents and the next deadlines.
- Click Overview at the top of the menu.
- Before your own program is set up, click Explore the sample company to load the program of Examplify Inc., a fictional company, or Set up my company to start your own.
- Click any number in the top row, any framework, deadline or next step to open its page.
- To return to an empty program later, open Company profile and click Remove all program data twice.
The posture score weighs each safeguard by how much it reduces real risk: multi-factor authentication, backups and patching count more than a clean desk.
Company profile
The profile decides which frameworks are suggested, which notification deadlines apply to an incident, and the names used in your policies.
- Open Company profile. Enter the company name, industry, security owner and where people report incidents. Each field is saved when you leave it.
- Choose the data you hold (personal, customer, health, payment card, financial account data) and where you operate.
- Choose what applies to you: selling to businesses, a US public company, a NIS2 entity, an EU financial entity under DORA or regulation by NY DFS.
- Enter the notice period in your customer contracts, in hours. Incidents involving customer data use it as a deadline.
- Under Frameworks to track, click each framework to add or remove it.
- Under Team workspace, enter your name for the activity log and, to share the program, choose a shared folder with Choose folder, then press Save workspace.
- Under Backups, press Back up now before a large change. A copy is also made every day and before loading the sample company, removing the program or restoring. To go back, press Restore beside a backup, then press it again to confirm; the version it replaces is backed up first.
Framework readiness
Frameworks lists every requirement of each framework you track, with the safeguards that cover it and its state: met, partly met, gap or not assessed. A requirement is met when all of its safeguards are in place; partly in place counts half.
- Open Frameworks and choose a framework tab: SOC 2, ISO 27001, NIST CSF 2.0, CIS Controls, HIPAA Security, PCI DSS 4.0, NIS2 or Cyber insurance.
- Click Gaps to list only the requirements not covered yet.
- Click a safeguard name under a requirement to assess it on the Safeguards page.
- Click Export readiness workbook to save an Excel workbook with every framework, your safeguards and the ISO 27001 Statement of Applicability, or Export mapping to save one framework's requirements and safeguards as a spreadsheet.
Readiness is your own assessment. It shows how prepared you are for an audit or assessment; the auditor decides the outcome.
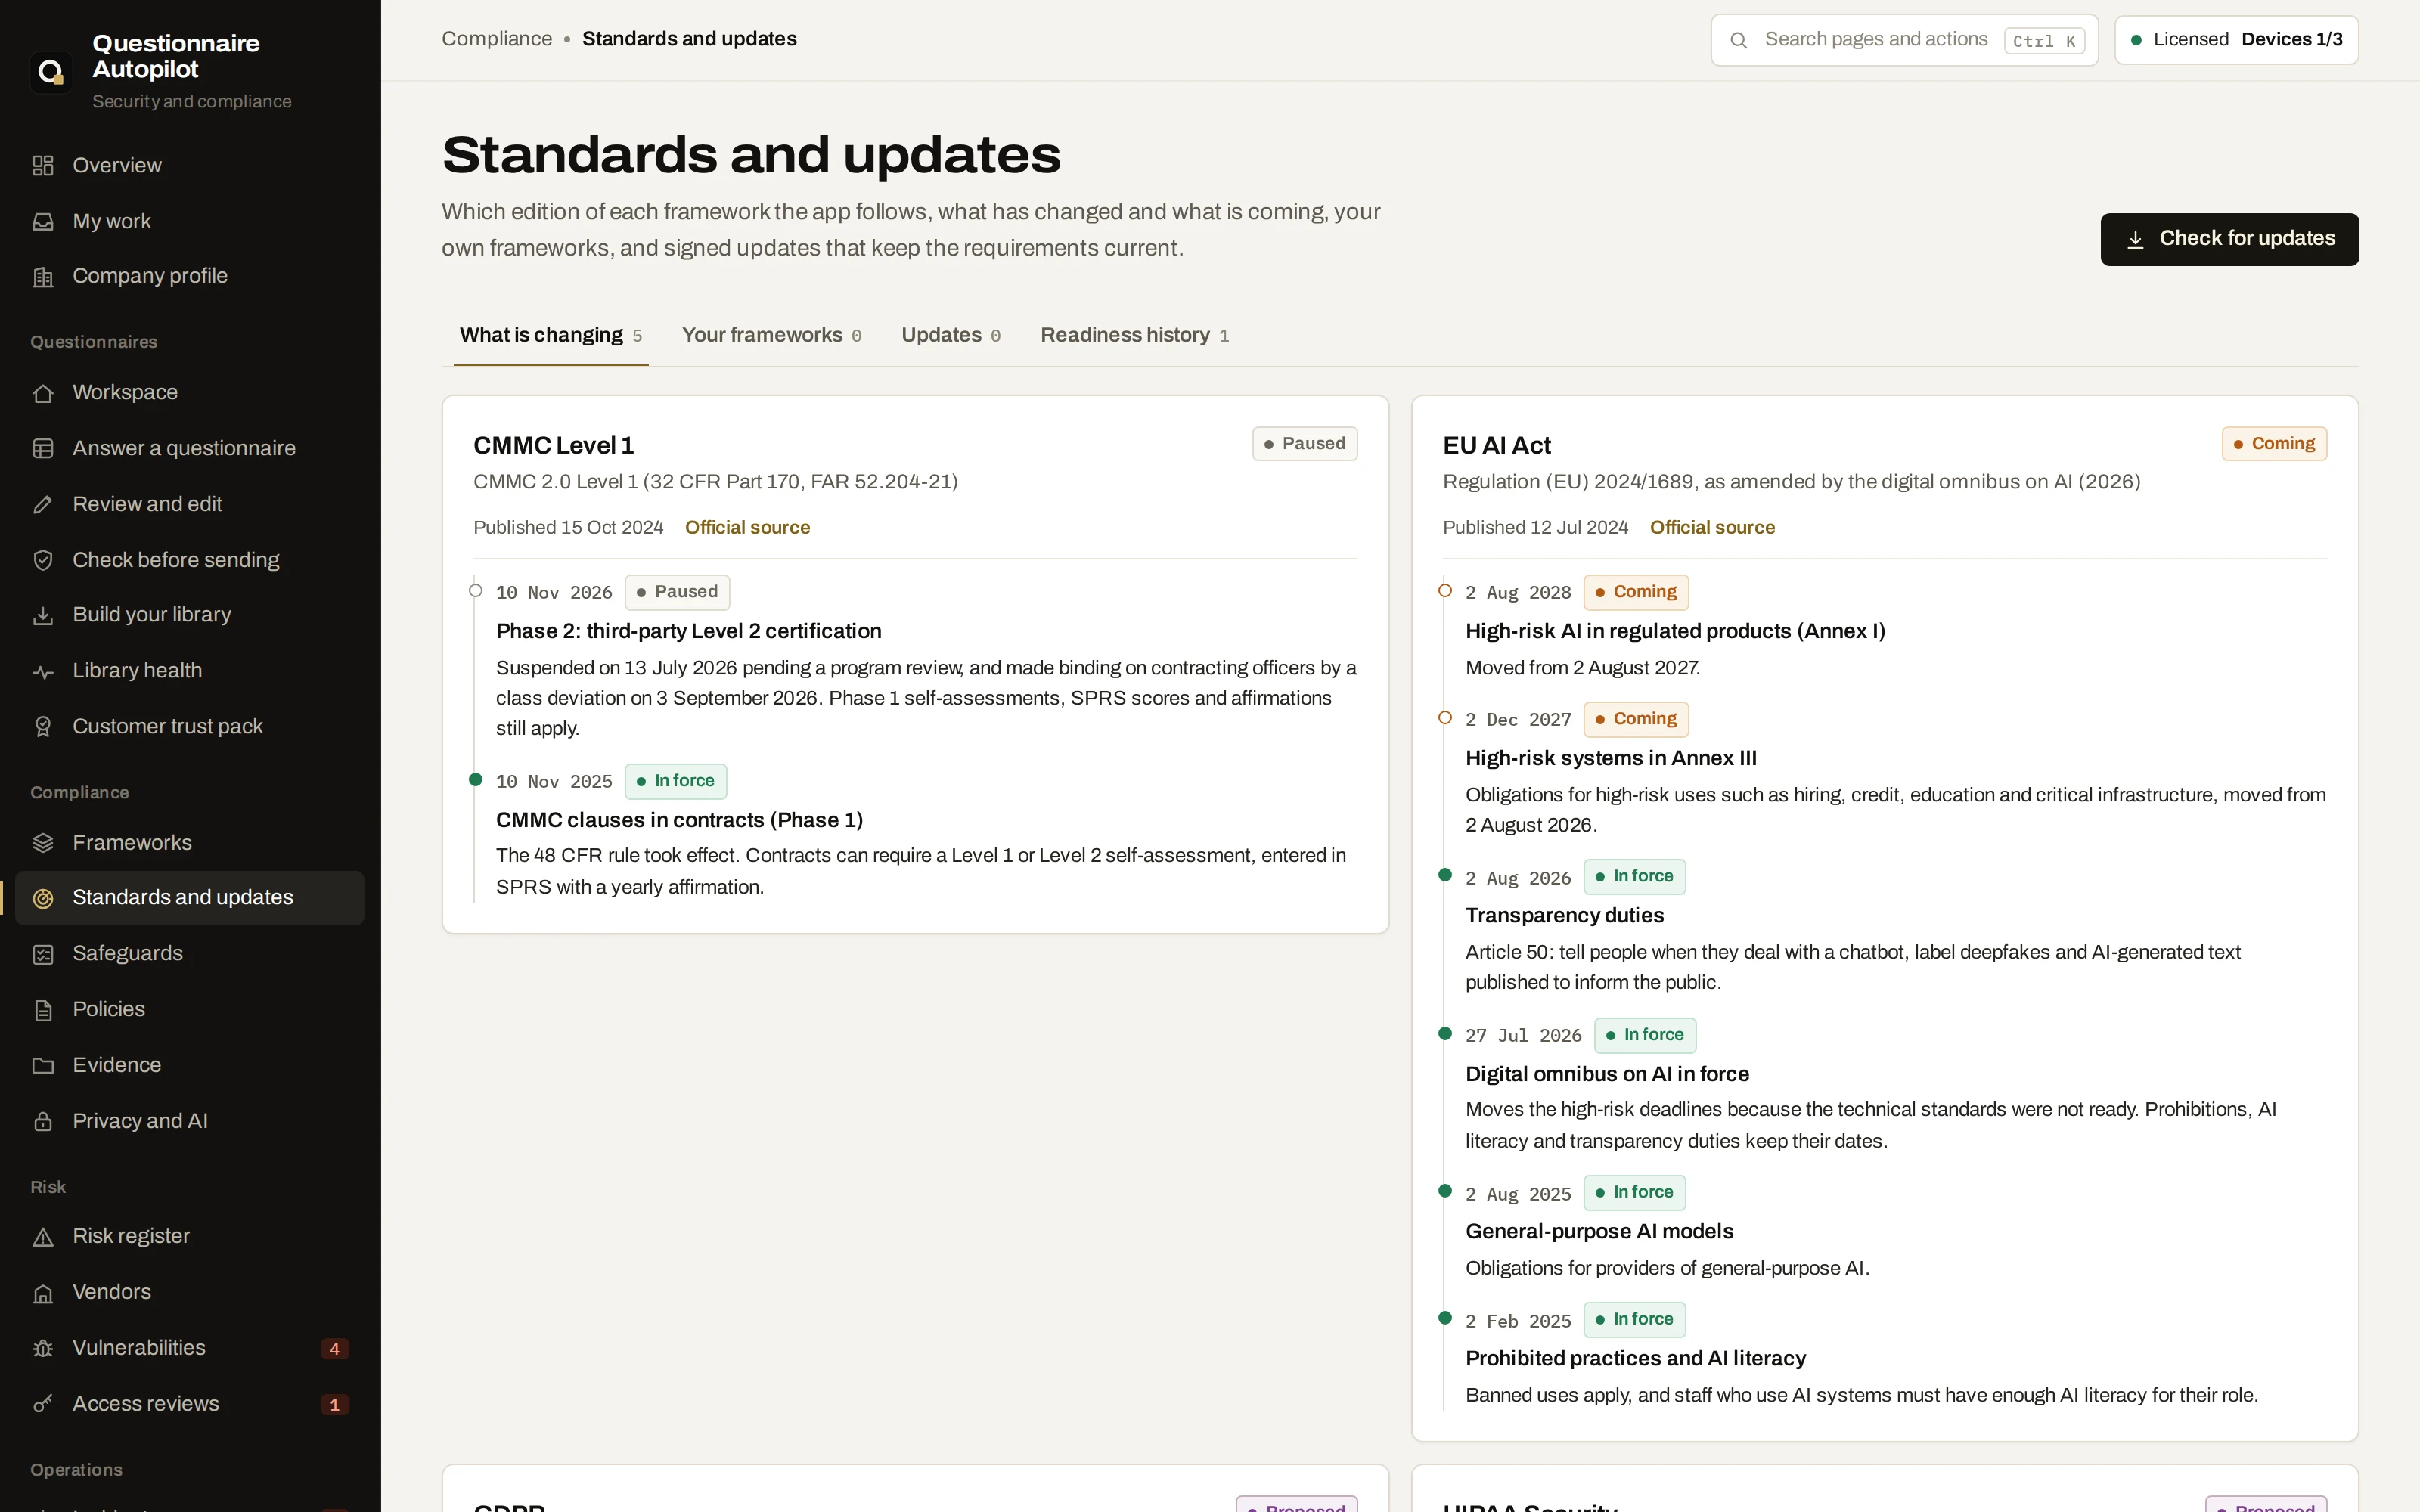
Standards and updates
Standards change: new editions, deadlines that move, rules that are proposed or paused. Standards and updates shows the edition each framework follows, every dated change and what it means, and lets you add frameworks of your own.
- Open Standards and updates. What is changing lists the frameworks you track, each with its edition, the official source and a timeline marked In force, Coming, Proposed or Paused. Coming dates also appear in the Overview deadlines and the Calendar.
- Press Check for updates. If PrautoForge has published a signed standards update, the app shows each framework it changes: requirements added, removed, changed or renumbered, and your readiness before and after. Press Install update to apply it, or Not now. On a computer without internet, choose Updates, then Open an update file.
- To add a customer's security requirements or an internal standard, choose Your frameworks, then Import from a spreadsheet (one requirement per row, in a column named Requirement, with an optional ID column) or New framework.
- The app suggests the safeguards each requirement means. Check every suggestion: remove a safeguard that does not fit, add one from Add a safeguard, or press Suggested, confirm. Then press Save framework. It appears on the Frameworks page with its readiness.
- Readiness history shows your posture score over the last year. Name a record before an audit or a board meeting with Record now. A record is also made before and after each standards update.
Installing an update never changes your safeguard assessments. Updates are signed by PrautoForge; the app refuses any file that is not.
Assess safeguards
52 safeguards cover what the frameworks ask for, grouped by area. You assess each one once.
- Open Safeguards. The tabs filter by status: not assessed, not in place, partly or in place.
- Click a safeguard. The panel shows the question and what in place means.
- Choose In place, Partly, Planned, Not in place or N/A.
- Enter the owner and the evidence (a document, report or ticket) and any notes.
- If you chose an answer library, Use my library marks the unassessed safeguards your approved answers describe as partly in place, citing those answers. Confirm each one before marking it in place.
Security policies
Seventeen policies are written from your company profile and the safeguards each one governs, with framework references.
- Open Policies and click a policy to read it.
- Adapt it to how your company works. Save it as Word with Save as Word and edit it there.
- When it is approved, enter who approved it and the version, and click Approve. Its yearly review appears on the calendar.
- Write all policies saves every policy as Word, HTML and Markdown in the
policiesfolder of your results folder.
Risk register
Each risk has a likelihood and an impact from 1 to 5. Their product is the score: 20 and above is critical, 12 to 19 high, 5 to 11 medium, below 5 low.
- Open Risk register. Click Add a risk, or Add beside a risk suggested from your safeguard gaps.
- Enter the owner, likelihood, impact, the residual rating after treatment, due date, status and treatment: mitigate, accept, transfer or avoid.
- Add the safeguards that treat it, then click Save.
- The heat map shows where open risks sit. Overdue due dates are marked in the register.
Vendor risk
Each vendor is tiered from the data it holds, its access to your systems, how much you depend on it and how it connects. Regulated data or administrator access is never below High.
| Tier | Review | Questionnaire |
|---|---|---|
| Critical | Every 12 months | 44 questions, plus its SOC 2 report or ISO 27001 certificate |
| High | Every 12 months | 30 questions |
| Moderate | Every 24 months | 15 questions |
| Low | Keep registered | None needed |
- Open Vendors and click Add a vendor. Choose the data it holds, its access, what happens if it stops working and how it connects, then click Add vendor.
- Click Create questionnaire to save an Excel questionnaire sized to the tier, and send it to the vendor.
- When it comes back, click Score their answers and choose the file. The app shows a rating, red flags and the residual risk.
- Click Reviewed today after each review; the next one appears on the calendar.
Incident response
An incident lists the parties who may need to be told and the deadline for each, from your company profile and what the incident involves: your cyber insurer, data protection authorities under GDPR, NIS2 and DORA authorities, the SEC, HHS, NY DFS, card brands, US states and customers.
- Open Incidents and click Record an incident. Choose its kind and severity, enter when you became aware and what it involves, then click Start the response.
- Follow the First move, then tick each playbook step as it is done.
- Add timeline entries as decisions are made. Change the status as the incident is contained, recovered and closed.
- When a notification is made, click Mark as notified under it.
- Click Incident report to save a report for leadership, the insurer and counsel.
Which notification duties apply is a legal decision. The deadlines make sure none is overlooked; confirm them with counsel.
Calendar and reports
The calendar lists recurring activities from your safeguards (access reviews, restore tests, training, penetration tests), vendor reviews and policy reviews.
- Open Calendar. Items are grouped into overdue, due in 30 days and later.
- When an activity is done, set the date and click Done.
- Open Reports and click Create report for the security posture report, or Create workbook for the readiness workbook. Print the report to PDF from your browser.
The command line does the same: qa program status, qa program report --out reports, qa program policies.
Evidence and operations
Team workspace and My work
The program can live in a folder your team shares, so everyone with the app works on the same program.
- Open Company profile and find Team workspace.
- Enter your name for the activity log, click Choose folder beside Program folder and pick a shared or synced folder (OneDrive, Google Drive, Dropbox or a network drive), then click Save workspace. The program is copied there.
- On each other computer, choose the same folder. Saves are locked while they are written, so two people never overwrite each other.
- Open My work to see the safeguards, risks, vendor reviews, access reviews and incidents whose owner field has your name.
- Open Activity log (in the menu, or the link at the top of the Team workspace card) to see every change with the time and the person's name. Choose a person under Show changes by to see only theirs.
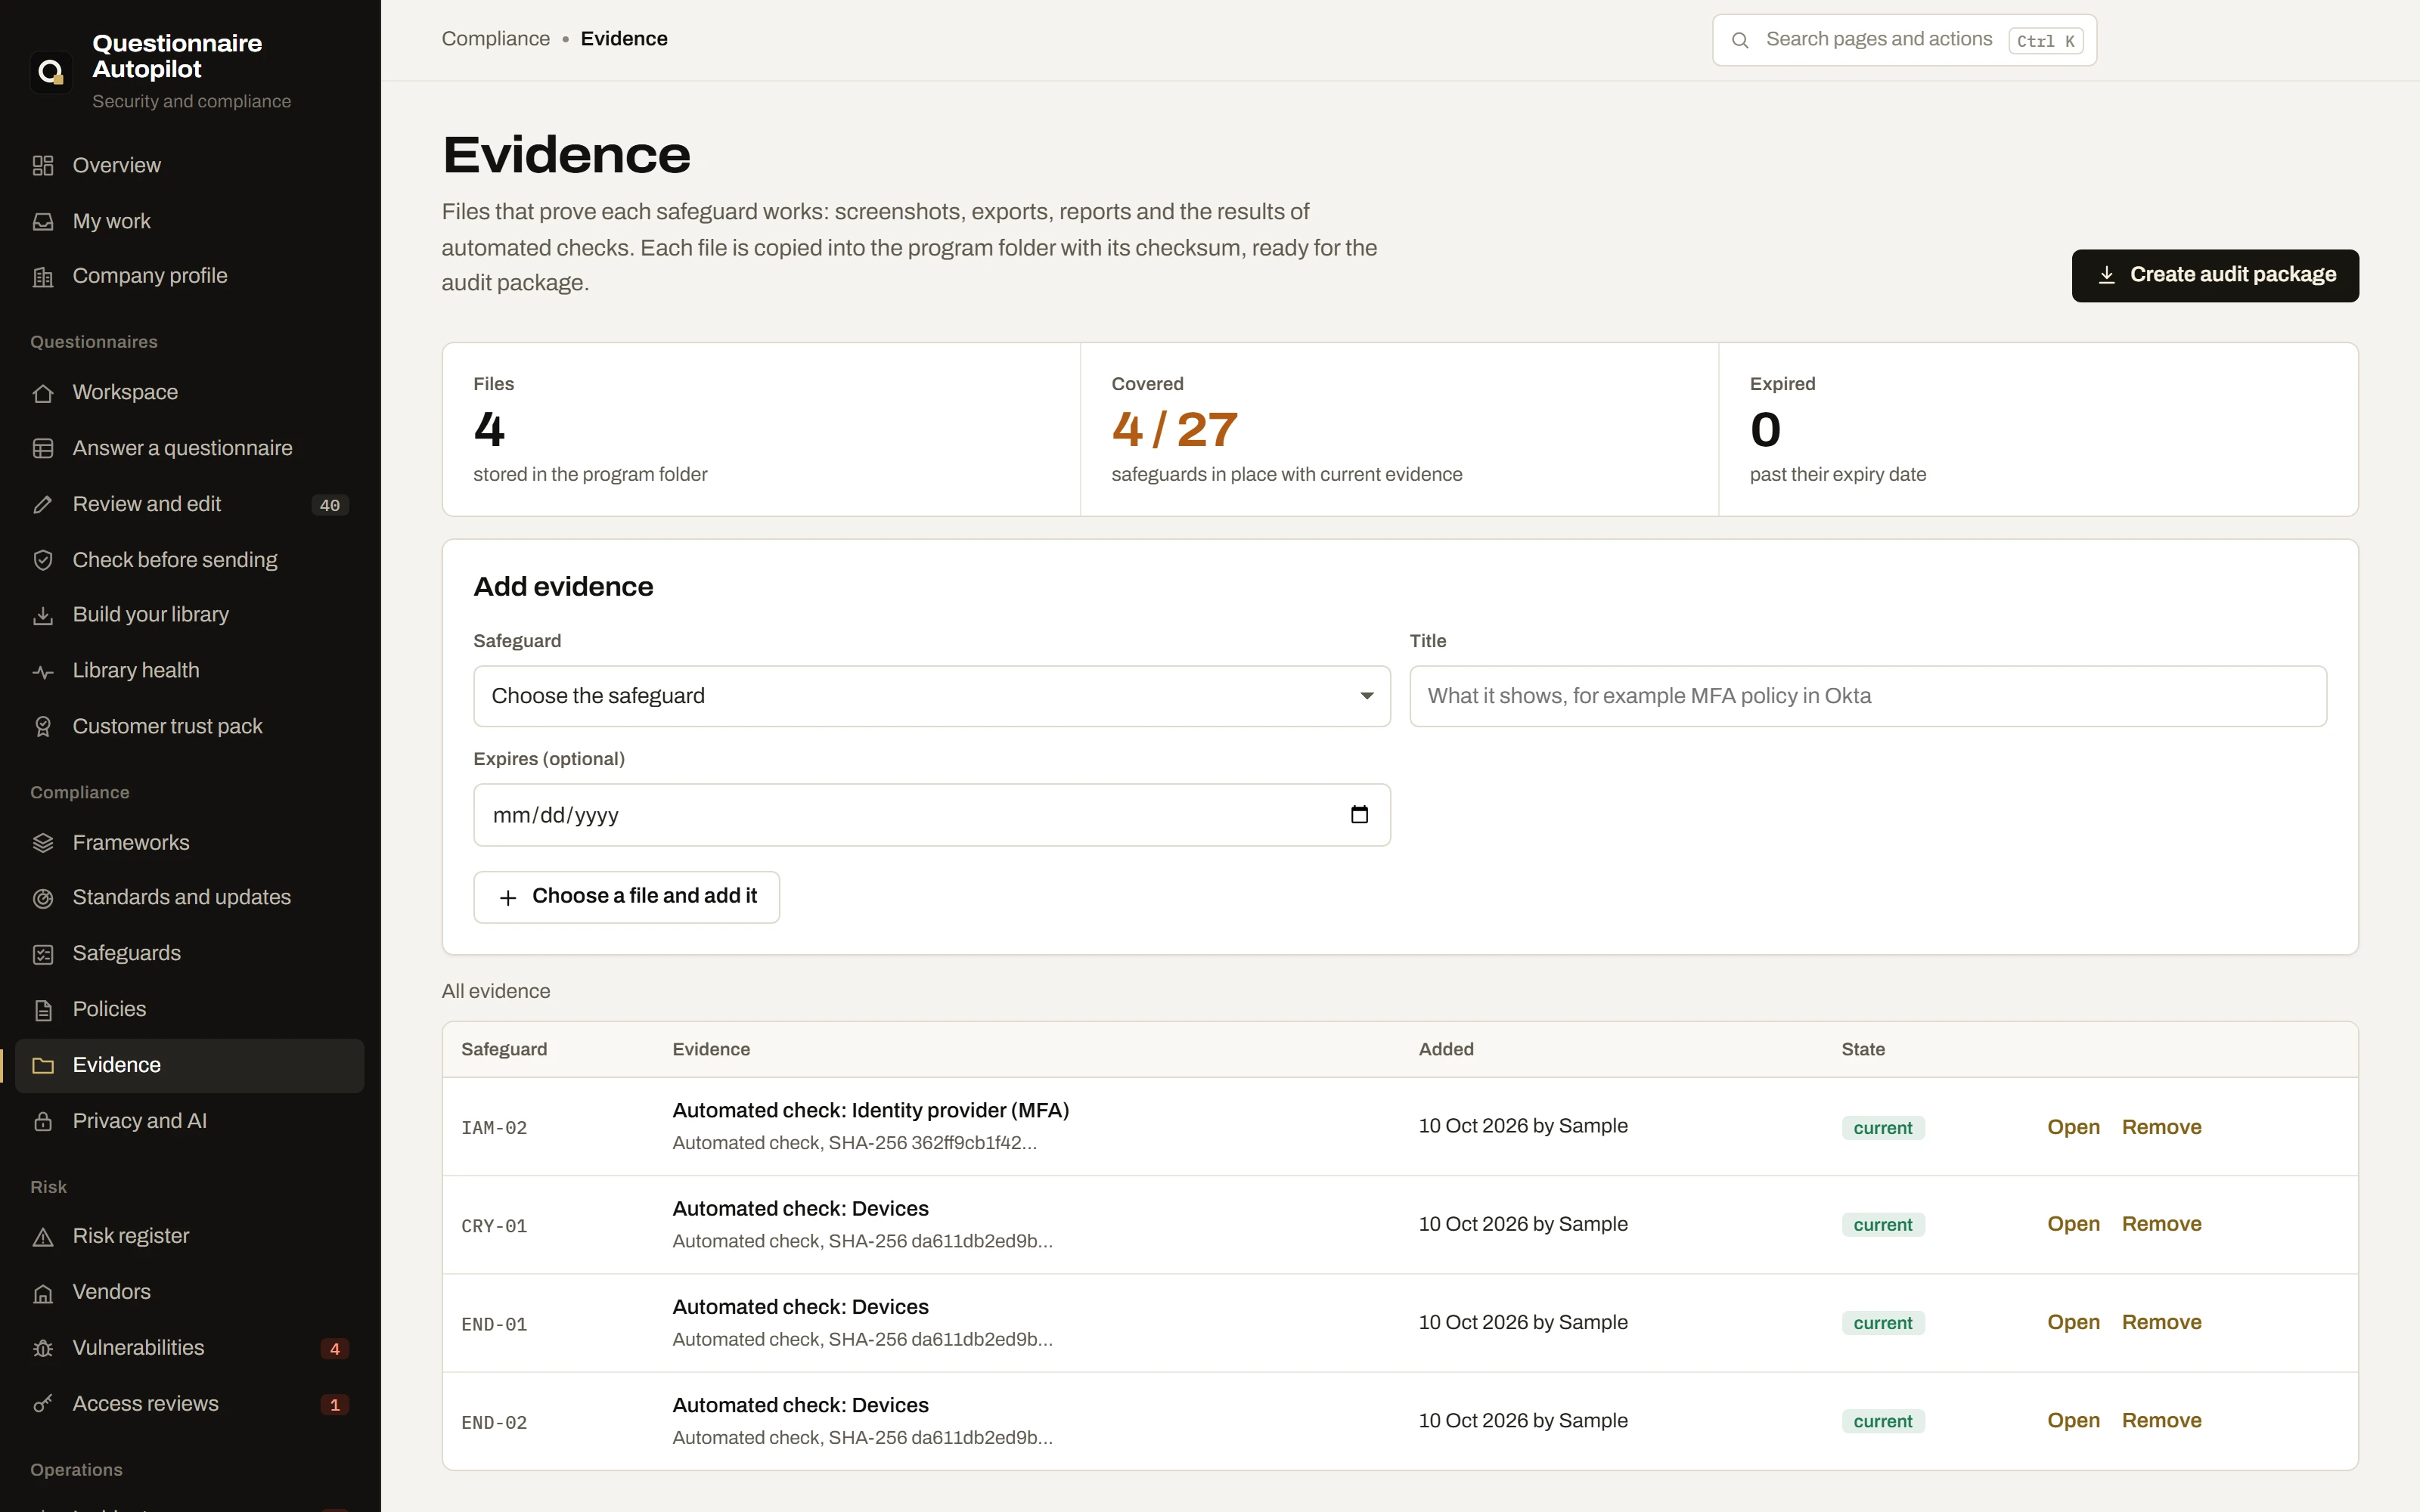
Evidence and the audit package
Evidence files are copied into the program folder, under the safeguard they prove, with a SHA-256 checksum and an optional expiry date.
- Open Evidence, choose the safeguard, give the file a title and, for things like certificates or reports, an expiry date. Click Choose a file and add it. You can also attach a file from a safeguard's panel on the Safeguards page.
- The Covered figure shows how many safeguards marked in place have current evidence. Expired files are marked.
- Click Create audit package. The zip holds the readiness workbook, Statement of Applicability, policies, risk register, vendors, findings, access reviews, staff records, registers, the activity log and every evidence file, with an index of checksums.
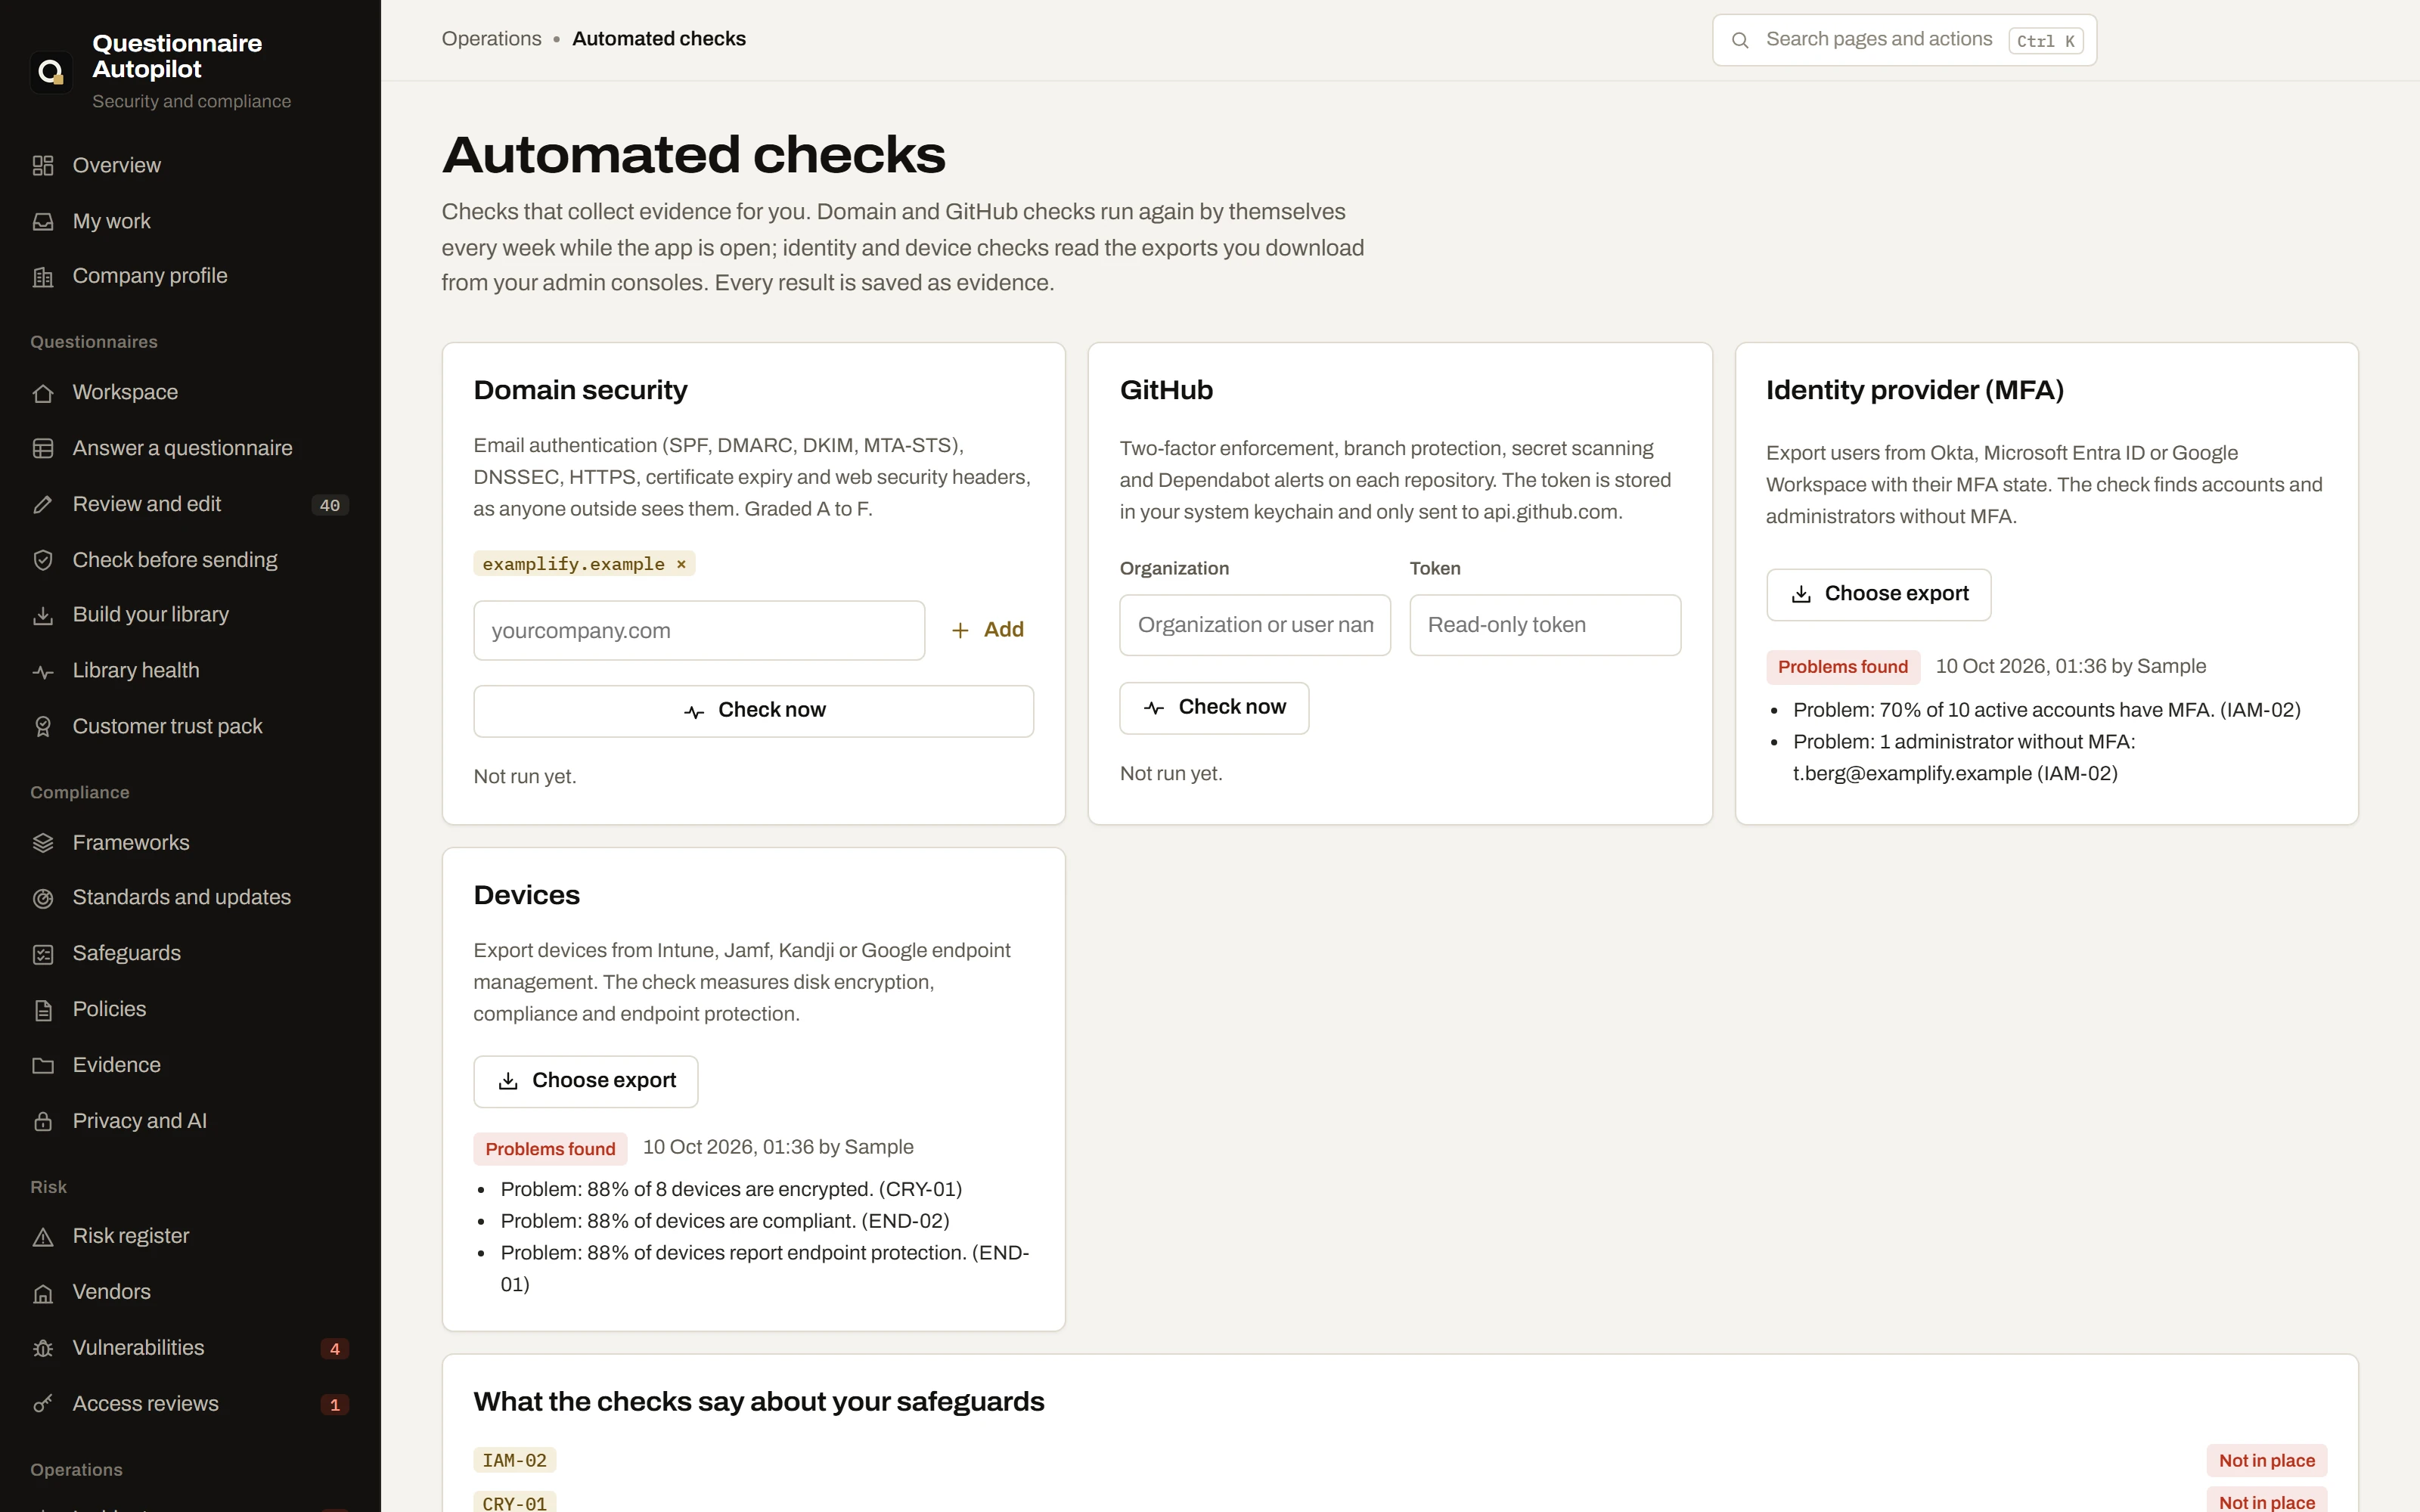
Automated checks
Checks collect evidence for you. Domain and GitHub checks run again by themselves every week while the app is open; identity and device checks read the exports you download from your admin consoles.
- Open Automated checks. Under Domain security, add your domains and click Check now. Each domain gets a grade from A to F for SPF, DKIM, DMARC, MTA-STS, DNSSEC, CAA, its certificate, TLS versions, the HTTPS redirect and security headers.
- Under GitHub, enter your organization and a fine-grained read-only token, then click Check now. The token is kept in your system keychain.
- Under Identity provider and Devices, click Choose export and pick the user or device export from Okta, Entra ID, Google Workspace, Intune, Jamf or Kandji.
- What the checks say about your safeguards lists the status each result points to. Click Set these statuses to apply them.
From a scheduled task or cron job: qa program run-checks.
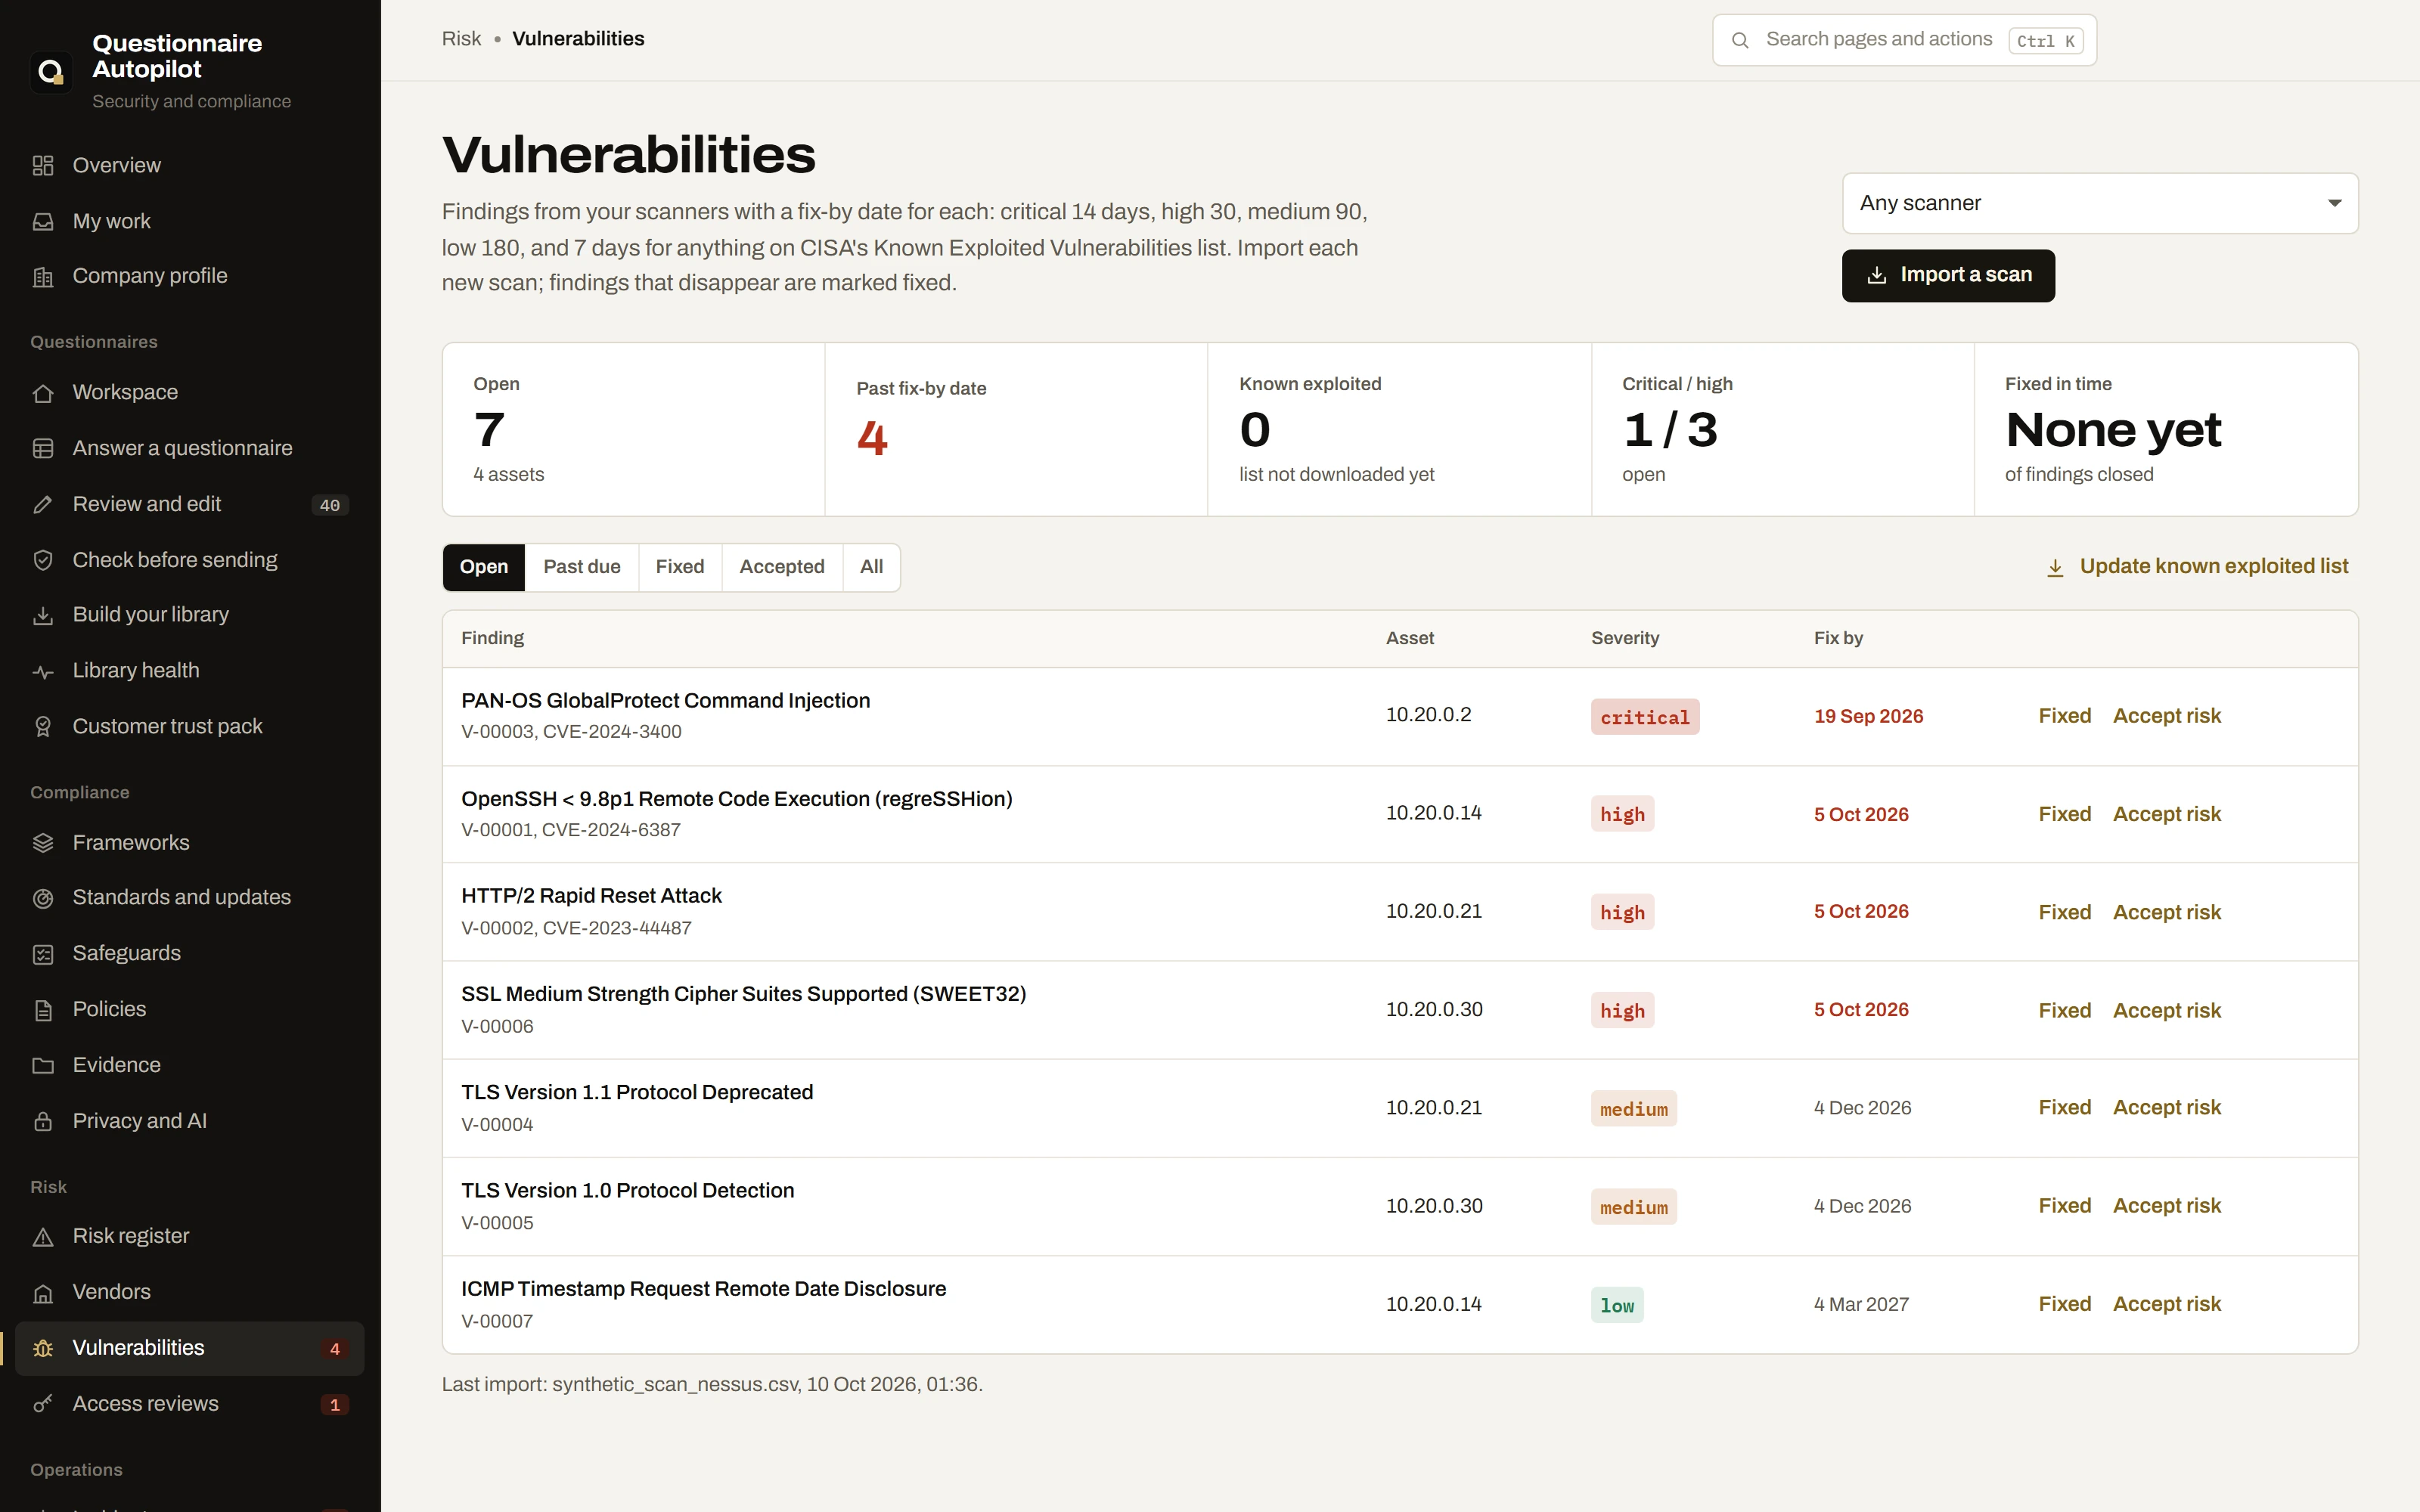
Vulnerabilities
| Severity | Fix by |
|---|---|
| On CISA's Known Exploited list | 7 days |
| Critical | 14 days |
| High | 30 days |
| Medium | 90 days |
| Low | 180 days |
- Export the scan from Nessus, Tenable, Qualys, Microsoft Defender or OpenVAS as CSV or Excel.
- Open Vulnerabilities and click Import a scan. New findings are added; findings missing from a newer scan of the same scanner and asset are marked fixed.
- Click Fixed when a finding is resolved, or Accept risk and write why.
- Update known exploited list downloads CISA's catalog and shortens the deadline of any finding on it.
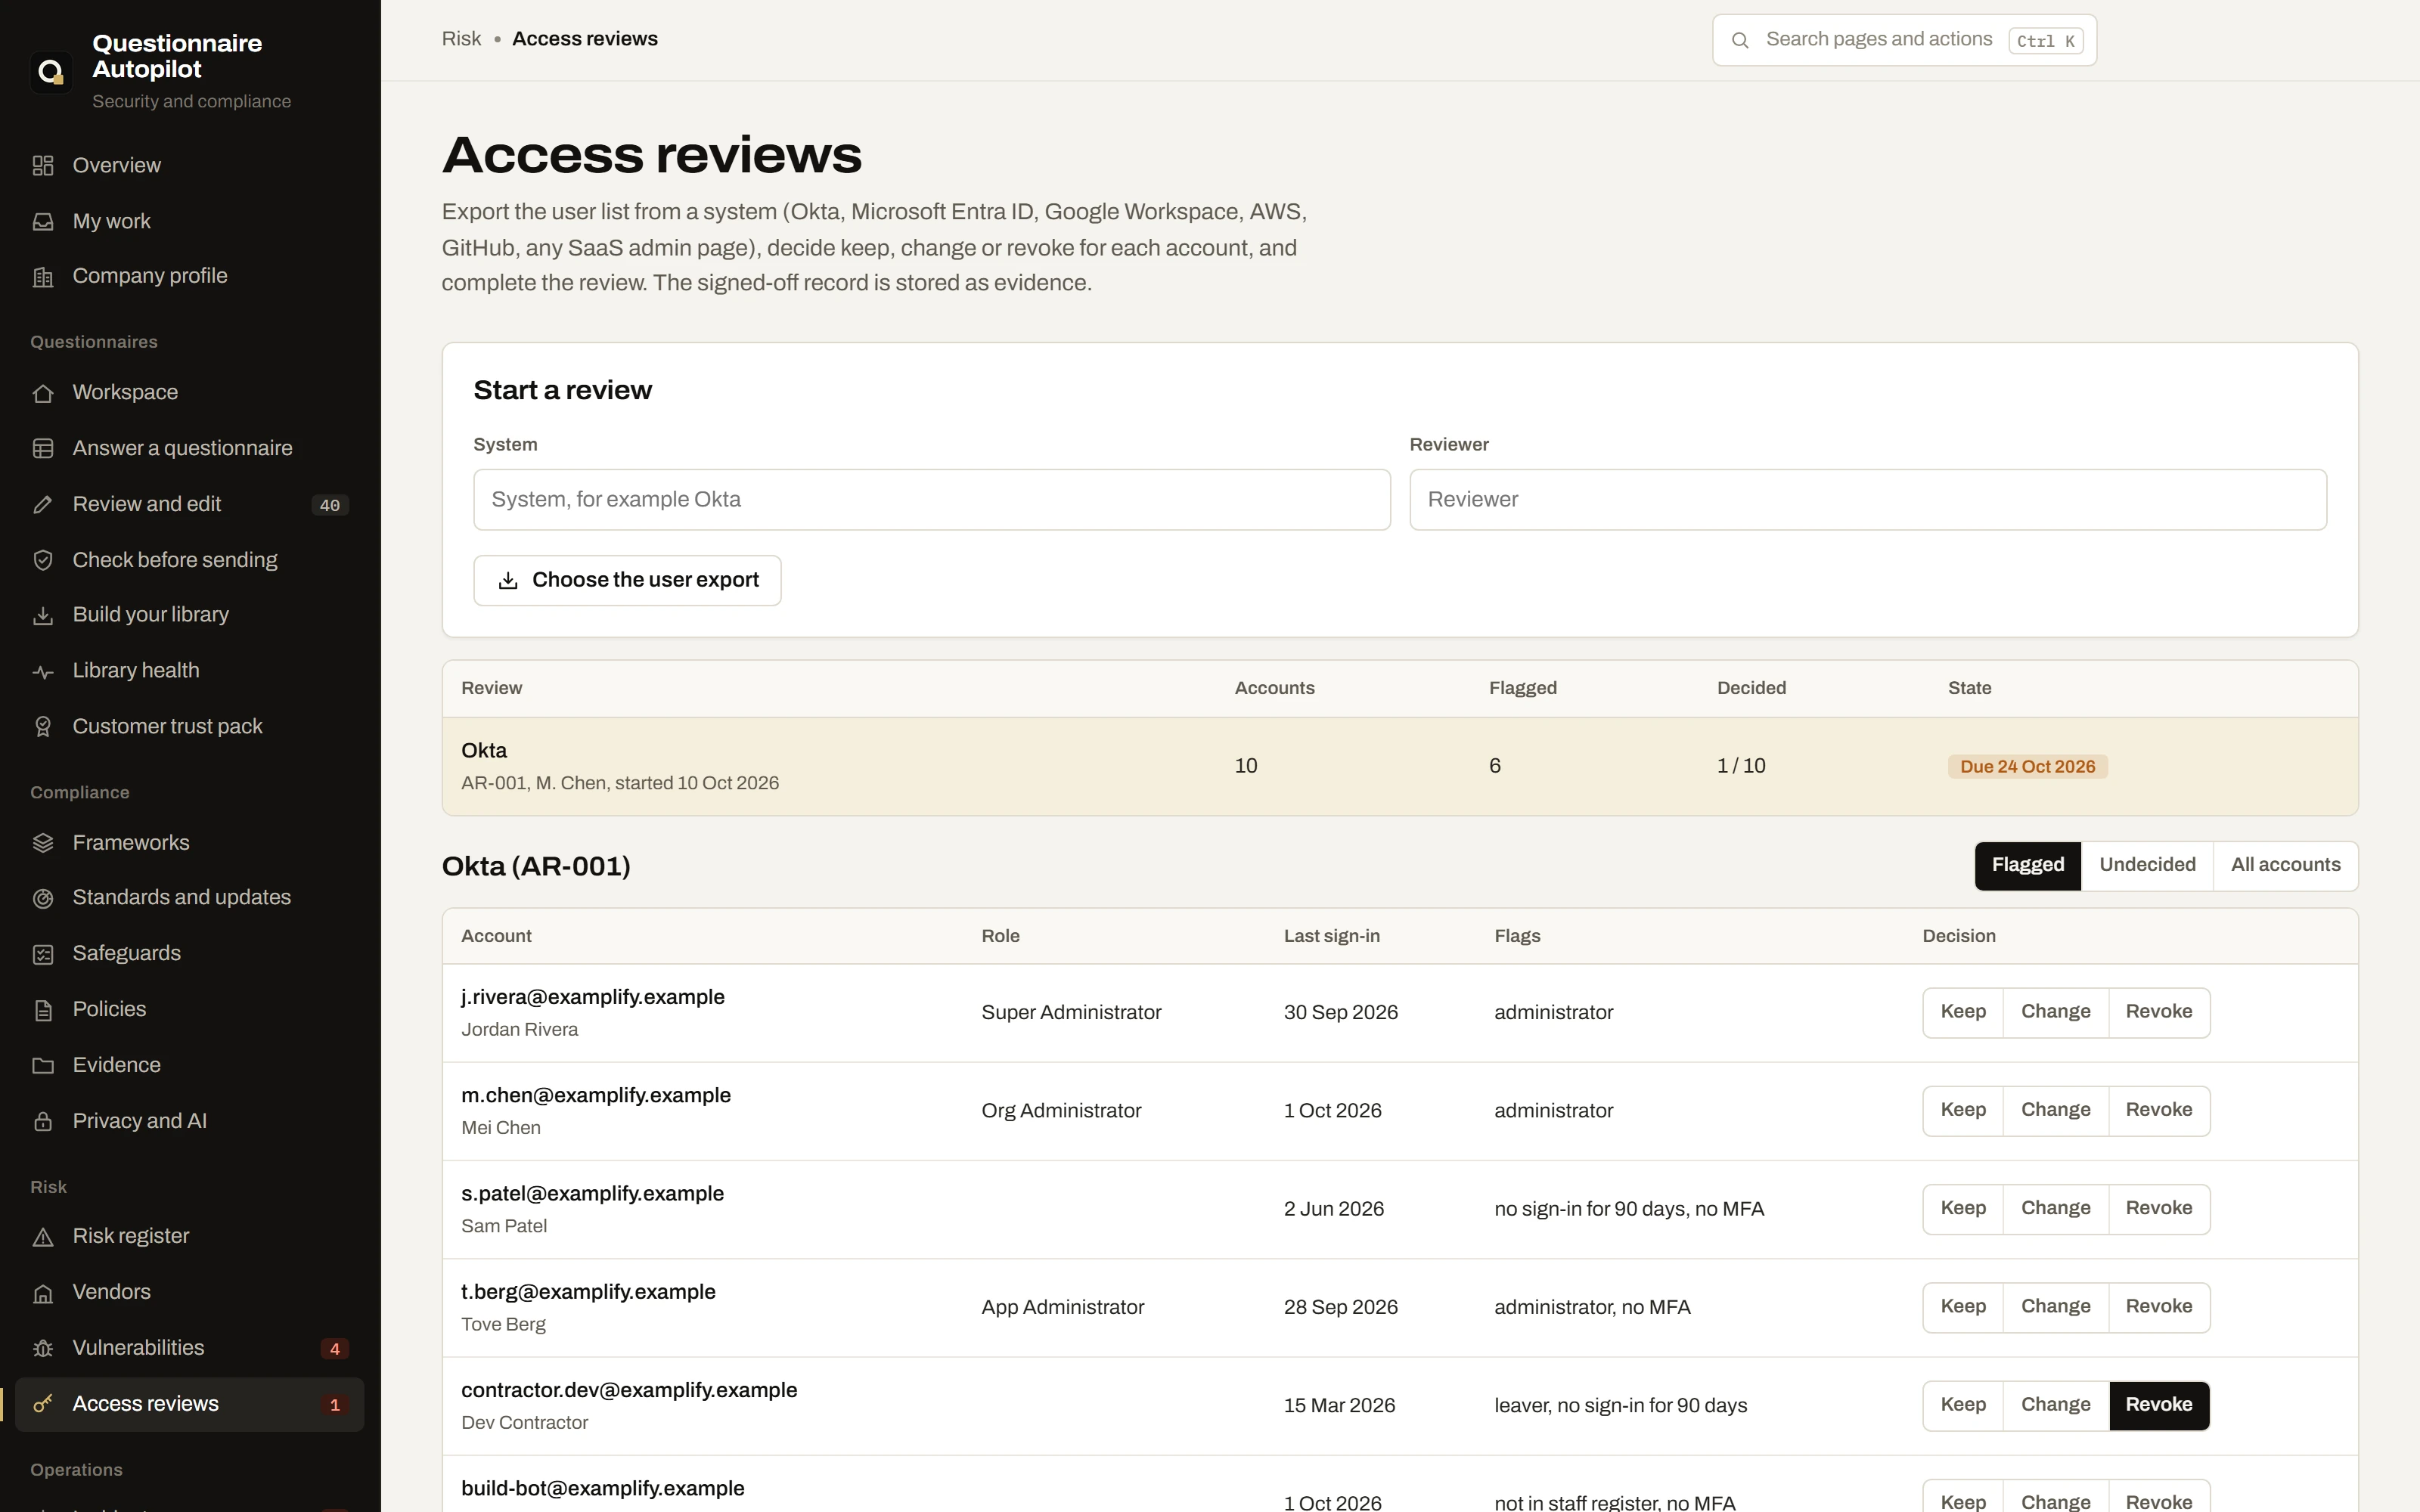
Access reviews
- Export the user list from the system you are reviewing (Okta, Microsoft Entra ID, Google Workspace, AWS IAM, GitHub or any admin page) as CSV or Excel.
- Open Access reviews, enter the system and reviewer, and click Choose the user export.
- Administrators, accounts without MFA, accounts unused for 90 days, people marked as left and accounts not in the staff list are flagged. Choose Keep, Change or Revoke for each account. Keep all unflagged accounts decides the rest at once.
- Click Complete the review. The record is saved as evidence and the next review appears on the calendar.
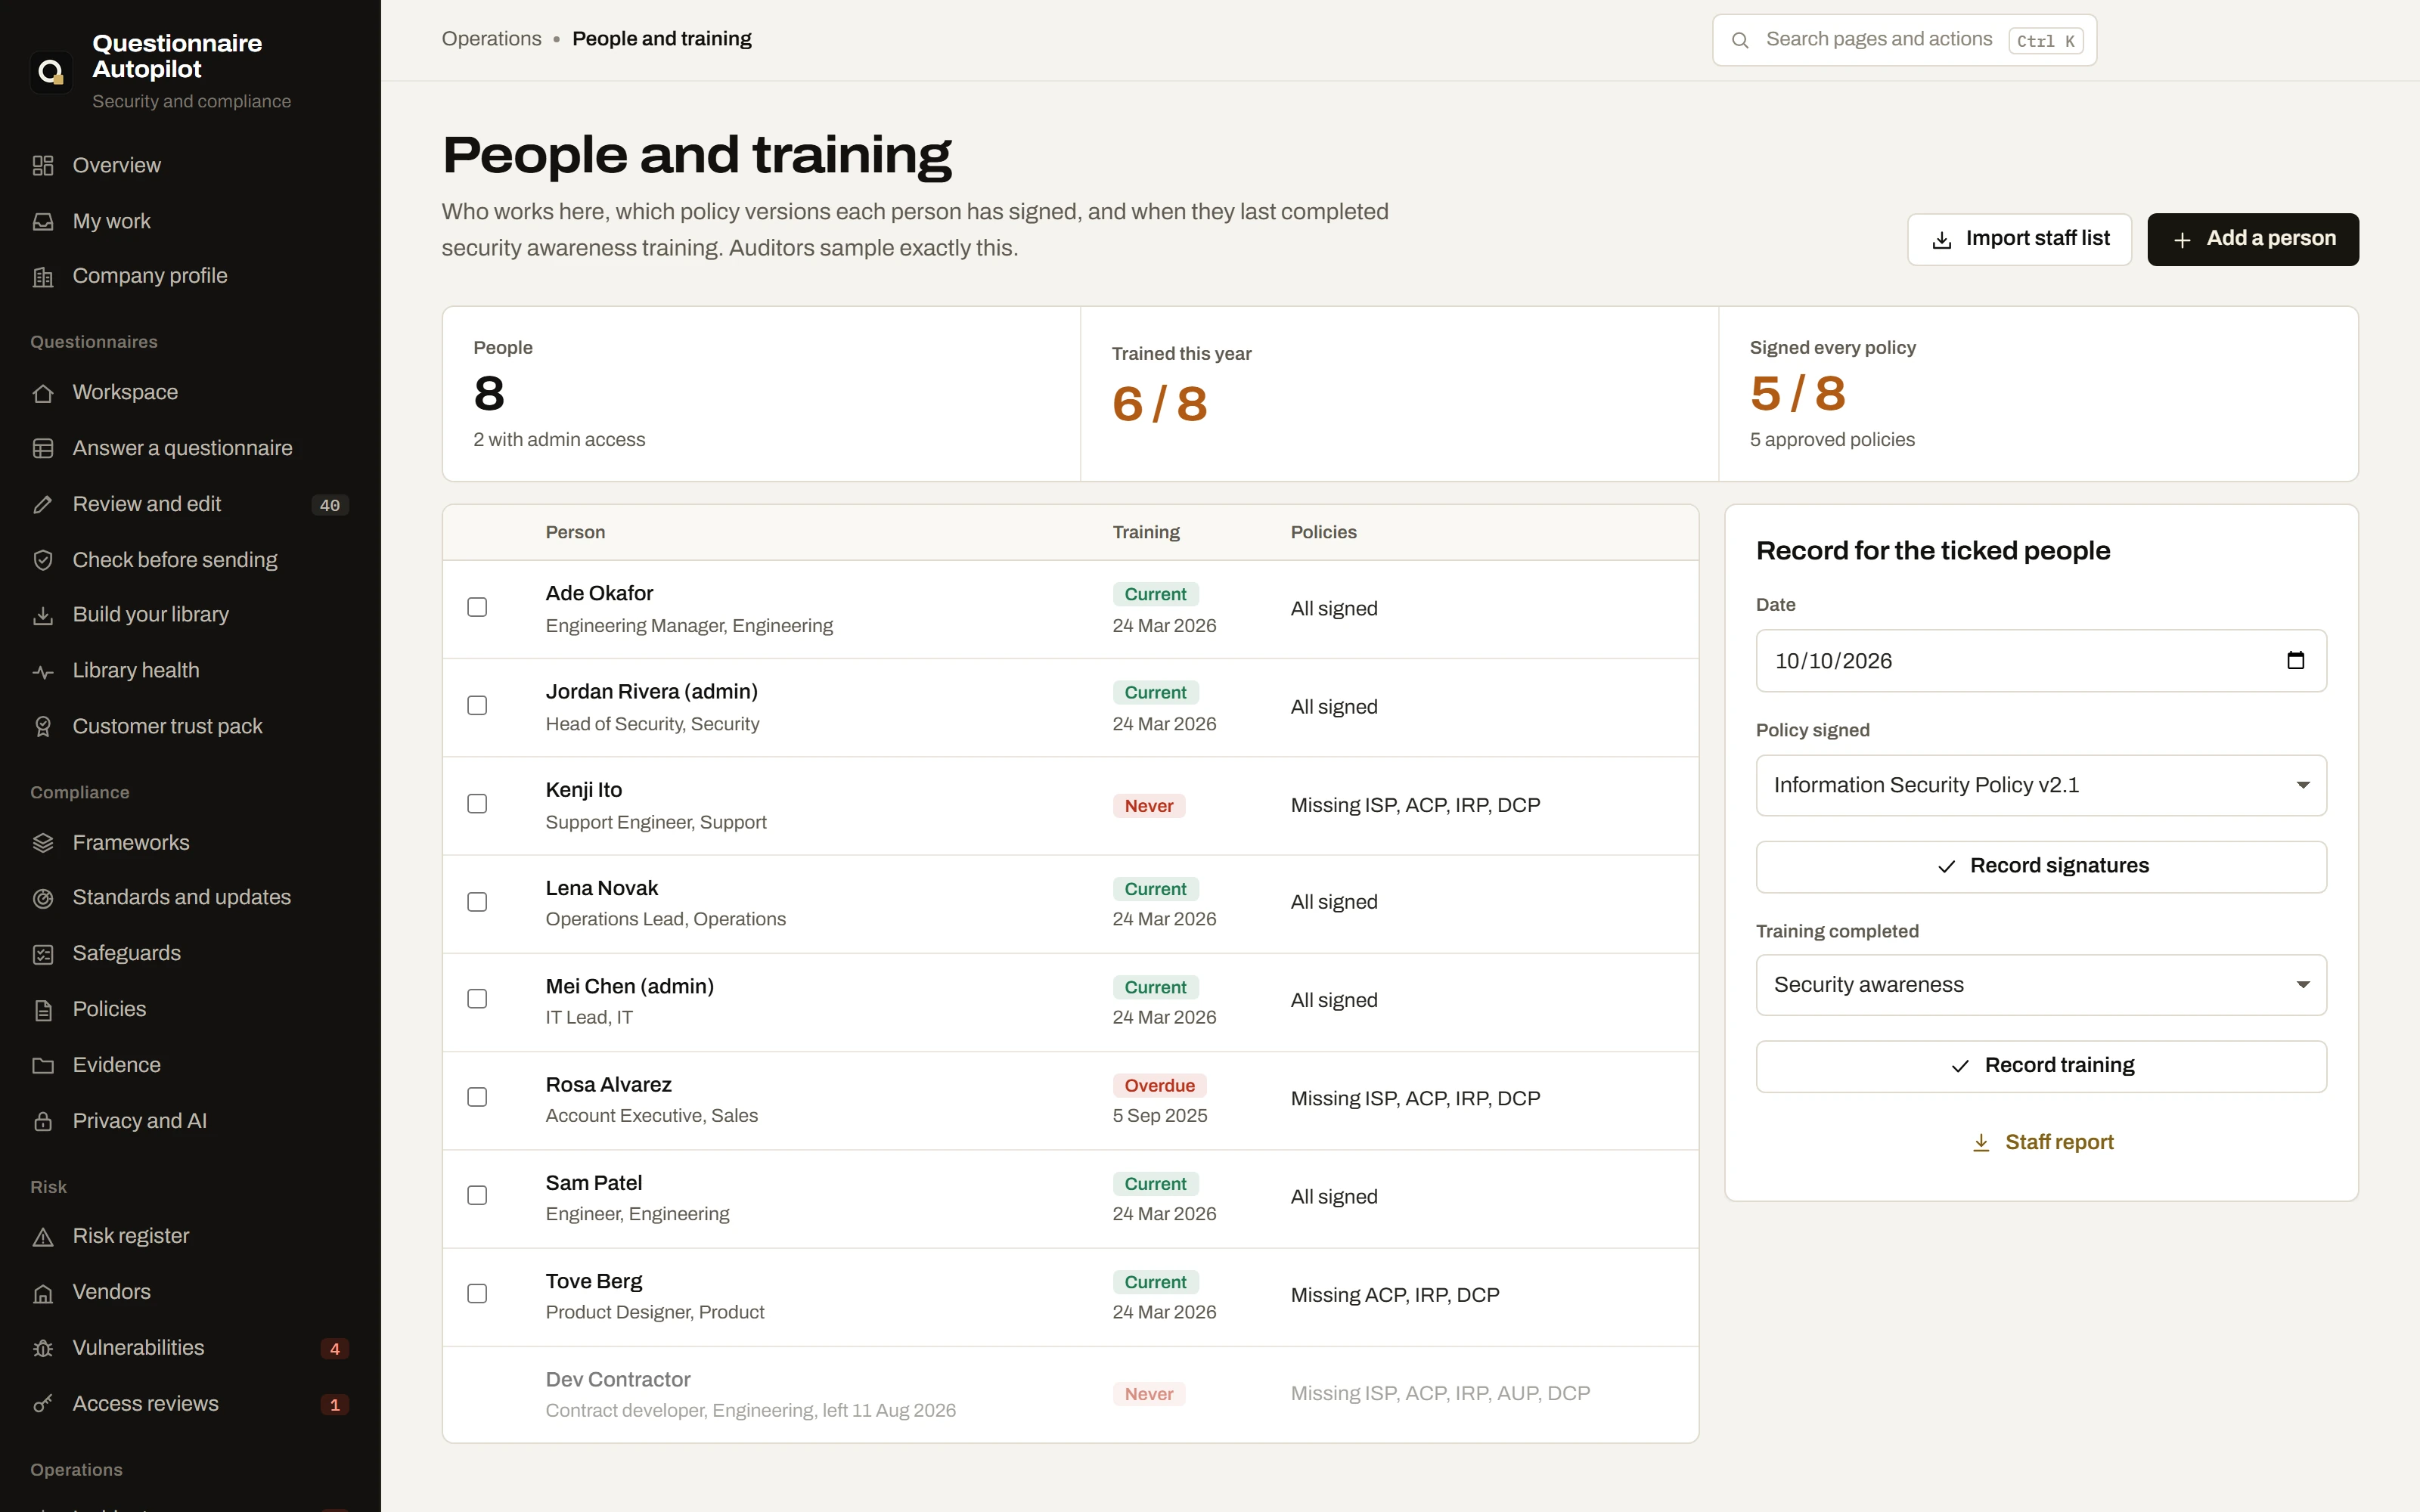
People and training
- Open People and training. Click Import staff list (CSV or Excel with names and emails) or Add a person.
- Tick the people who signed a policy, choose the policy and date, and click Record signatures. Only approved policies can be signed, by version.
- Tick the people who completed training, choose the course and click Record training. Security awareness is due again after twelve months.
- Staff report saves the records in Excel for the auditor.
Privacy, AI and the trust center
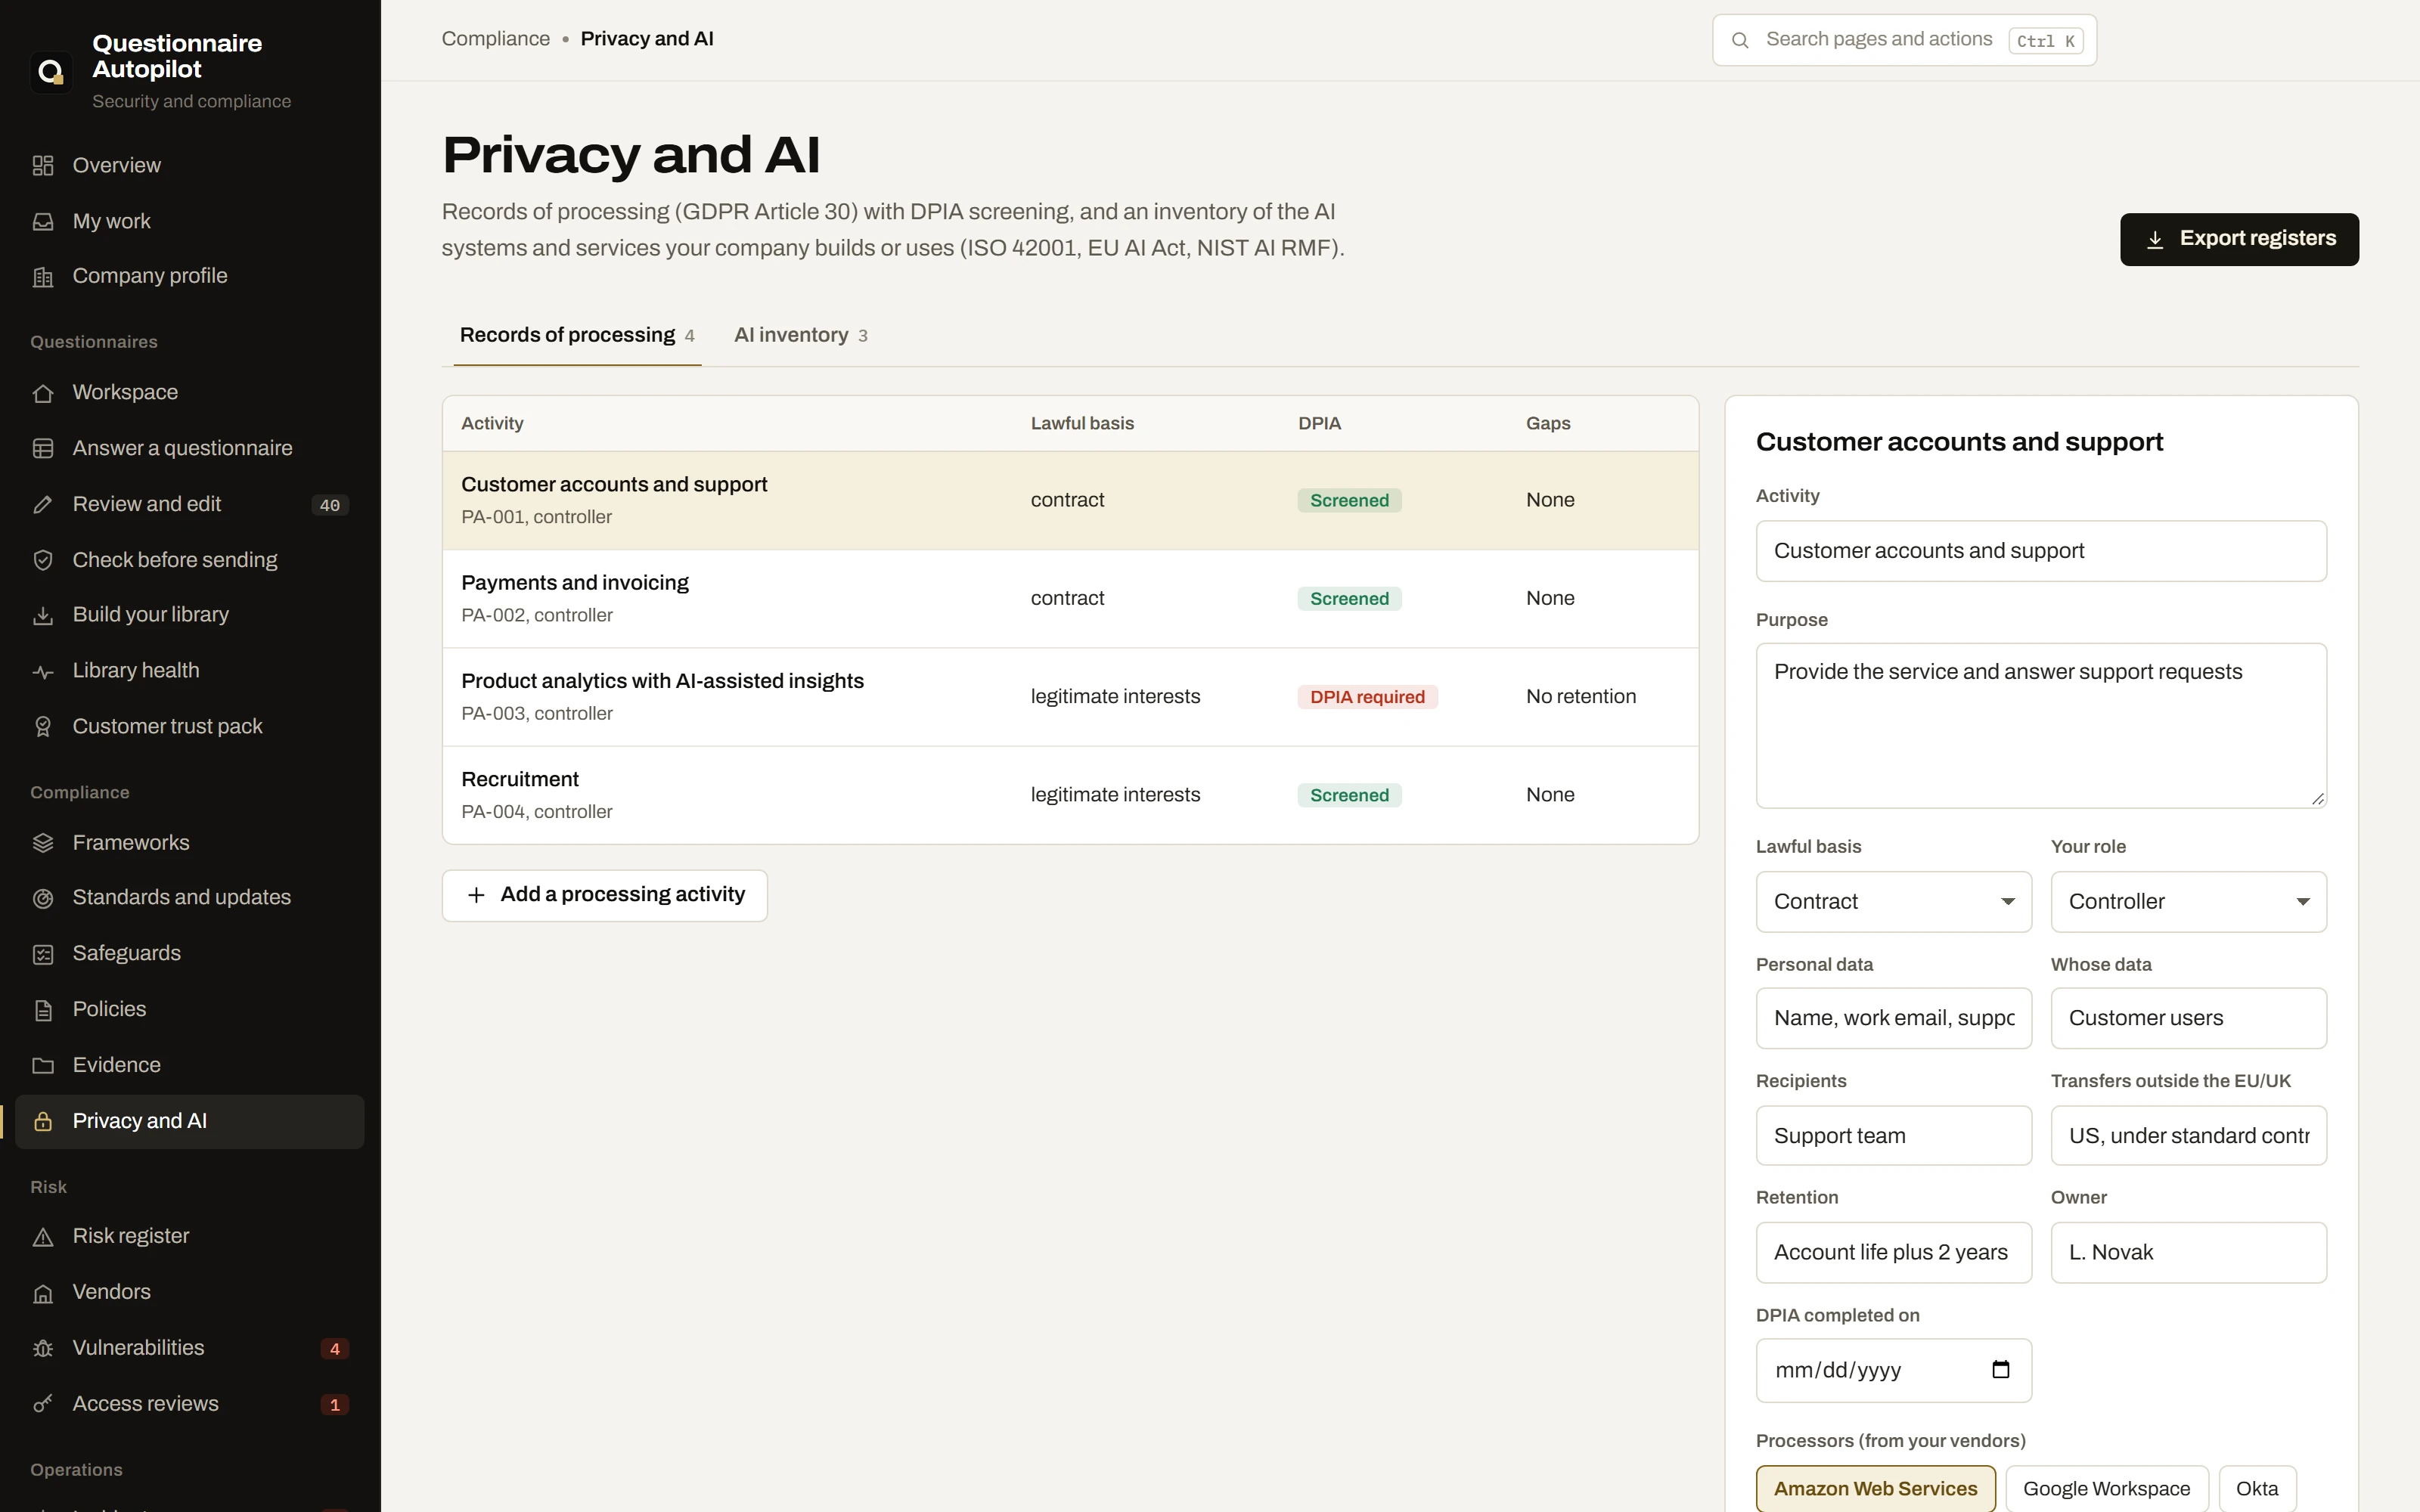
- Open Privacy and AI. Under Records of processing, add each way you use personal data with its purpose, lawful basis, data, recipients, processors and retention. Tick the DPIA criteria that apply; two or more mean a data protection impact assessment is likely required.
- Under AI inventory, add every AI tool staff use and every AI feature you build, with its owner, data, risk level, whether people review its output and whether the supplier trains on your data.
- Export registers saves both in Excel.
- In Vendors, tick List as a subprocessor for vendors that process customer data. In Company profile, type only the certifications and audits you actually hold.
- In Reports, click Build site under Trust center website. Upload the folder to any static host.
Your approved answers
Create your answer library
Your library is one spreadsheet of answers your team has approved. The app only ever uses these answers.
- On the Workspace page, click Create a new one under Your approved answers.
- The file
my_approved_answers.csvis created in your results folder, and the folder opens. - Open the file in Excel and add one row per approved answer, using the columns below. Replace the example row.
- Save the file as CSV or Excel. The Workspace page now shows your library. To use a different file later, click Change.
| Column | What to enter |
|---|---|
id | A stable reference for the answer, for example ENC-001. |
topic | A short topic, for example Encryption. |
question | The question this answer responds to. |
answer | The exact text your security owner approved. |
evidence_ref | Where the proof is kept, for example a policy section or audit report. |
approved_by, approved_at | Who approved the answer and the date, as YYYY-MM-DD. |
expires_at | Optional. After this date the answer is no longer used. |
keywords | Optional. Extra words that help the app find this answer. |
owner | Optional. The person or team who keeps the answer current. |
applies_to | Optional. The product, region or environment where the answer is true. |
shareable | Optional. yes only if the answer can go in a customer trust pack. Otherwise it stays private. |
Build your library from past questionnaires
If your team has completed questionnaires before, recover those answers instead of typing them again.
- Open Build your library.
- Click the card and choose a completed questionnaire in Excel format (
.xlsxor.xlsm). - Click Recover answers. The answers are saved to
approval_candidates.csvin your results folder. - Open that file in Excel. For each answer you accept, set
decisiontoAPPROVEDand fill inapproved_by,approved_atandevidence_ref. - Use the file as your library. Rows that are not marked
APPROVEDare never used.
Check library health
Check the library itself before a busy period, and whenever answers change.
- Open Library health and choose your library.
- Click Check library.
- Read the counts: active, shareable, expiring within 30 days, expired, and set aside.
- Work through each note. Renew expired approvals, resolve answers that contradict each other, and fix rows that were set aside.
Guard terms
Guard terms are words your team wants treated like certifications, such as a regulation or a service level. An answer that uses one is only accepted if your approved answers support it.
- Create a text file named
guard_terms.txtin the same folder as your library. - Write one term per line. Lines that start with
#are ignored. - Open Library health and click Check library. The terms found are listed under the notes.
- From now on, an answer that uses a guard term your approved answers do not support is marked At risk, in review and in the check before sending.
The library atlas
The Workspace page shows your approved answers as an atlas. Each point is one answer, and answers on the same topic sit together in a band with the topic name beside it.
- Drag the atlas to turn it.
- Point at an answer to see its question. Click it to open a card with the full answer, its evidence reference, who approved it and when, its expiry date, whether it is shareable, and how many questions in the last run used it.
- Click Ask Intellinaire on the card to open the chat with a question about that answer. See Intellinaire, the assistant.
- Click a topic below the atlas to show only its answers. Click it again to show all.
- Type in Find an answer to highlight every answer that contains the text.
- Use the + and − buttons to zoom, or hold Ctrl and scroll. The last button resets the view.
Expired answers are drawn as rings and answers set aside are drawn smaller and grey. During a run, each question travels to the answers it used, in the color of its result.
Answering questionnaires
Answer a questionnaire
- Open Answer a questionnaire.
- Click the first card and choose the buyer's questionnaire, in Excel or CSV format, exactly as they sent it. It needs a column named like Question, Requirement or Control.
- Click the second card and choose your approved answers.
- Check Save results in. Click Change to choose another folder.
- Click Answer questionnaire and wait for the run to finish.
- Click Open report to see every question with its status and evidence, or Review answers to work through them in the app.
Each question receives one status:
| Status | Meaning | What to do |
|---|---|---|
| Matched | Your approved answer, copied word for word. | Check that it fits the buyer's wording. |
| Drafted | Written by the AI model from approved evidence and checked. Only with AI drafting on. | Read it against the cited evidence. |
| Suggested | Related approved answers were found, but no draft was written. | Pick or combine the suggested answers. |
| Needs evidence | No approved answer covers the question. Nothing was made up. | Ask the owner for an approved answer and add it to your library. |
| Legal review | A contract, liability or legal question. Never drafted. | Send it to whoever owns contracts. |
| Flagged | The cell contains instructions or a formula, so it was not processed. | Read the cell yourself and answer it. |
| Draft blocked | An AI draft claimed more than the evidence says, so it was discarded. | Write the answer from the listed evidence. |
The results folder contains a filled copy of the buyer's workbook (the original is never changed), the review report, a review queue and a list of missing evidence.
Review and edit answers
- Open Review and edit, or click Review answers after a run.
- Use the filters (All, Needs a person, Drafted, Matched, Edited) or type in the search box to find questions.
- Select a question. Its answer appears beside the approved evidence it comes from.
- Edit the answer. The verdict under it updates as you type.
- Use Use approved wording to put back the approved text, Clear to empty the answer, or Revert to original to undo your edits.
| Verdict | Meaning |
|---|---|
| Approved wording | Exactly your approved answer. |
| Consistent | Edited wording that stays within your approved evidence. |
| Not in library | Nothing in your library covers the answer, so it cannot be checked. |
| Legal to confirm | A legal or contractual question has an answer. Confirm counsel approved it. |
| At risk | The answer claims something your approved answers do not support. |
| Unanswered | No answer has been entered yet. |
Export the final file
- In Review and edit, click Export final file.
- The app writes
final_answers.csvin a folder namedfinal. For an Excel questionnaire it also writesfinal_questionnaire.xlsx, a copy of the buyer's workbook with your final answers. The buyer's original file is never changed. - Every answer is checked once more. The result says whether the file is ready to send and lists anything to fix.
- Send the final file to the buyer yourself. The app never sends anything.
Check before sending
Use this for a final file that was edited outside the app, for example by colleagues in Excel.
- Open Check before sending.
- Choose the final questionnaire and your approved answers.
- Click Run the check.
- Fix every answer marked At risk, then run the check again until the file is ready to send.
- Click Open pre-send report to keep a record of the check with the questionnaire. New wording your team wrote is saved to
library_candidates.csv, ready to approve into your library.
Sharing with customers
Customer trust pack
A trust pack is a security overview page for customers, built only from answers you mark as shareable.
- In your library, set
shareabletoyesfor each answer that is safe to share. - Open Customer trust pack, choose your library and enter your company name as customers know it.
- Click Build trust pack. Private and expired answers are left out automatically.
- Click Open trust pack and read it before sending it. The page works offline and makes no network requests.
Intellinaire
AI drafting is optional. Without it, answers come only from your library. With it, questions that only partly match your library get a drafted answer, written from the approved answers it cites. Every draft is checked against those answers before you see it, and a draft that claims more is discarded.
AI on your computer
A model on your own computer keeps every question on that computer. You can use llama.cpp, Ollama or LM Studio.
- Start the model server. For example:
ollama run llama3.2for Ollama, the local server in LM Studio, orllama-server -m your-model.gguf --host 127.0.0.1 --port 8089 -c 8192for llama.cpp. - In the app, open AI drafting and choose the matching card under On this computer.
- Check the Address of the server. Enter the model name, or click Load list and choose one.
- Click Test connection. The model answers one test question.
- Click Use this model. Your next questionnaire is answered with drafting on.
Drafting speed depends on your computer. While the model writes, the video plays at five times normal speed and says so on screen.
AI with a cloud service
You can use your own key for OpenAI, Anthropic, Google Gemini, Mistral, Groq, OpenRouter or another OpenAI-compatible service. Only the question and up to three matching approved answers are sent, and only after you allow it.
- Open AI drafting and choose the service under Cloud services.
- Paste your API key and click Save key. The key is stored on this computer only, encrypted with your Windows account on Windows. You can also set it in an environment variable, such as
ANTHROPIC_API_KEY. - Enter the model name, or click Load list and choose one.
- Tick the box that allows sending questions and matching approved answers to that service.
- Click Test connection, then Use this model.
- To remove a saved key, click Forget saved key.
No key is entered in this video, and nothing is sent.
Turn AI drafting off
- Open AI drafting. In use now shows the model that drafts answers.
- Click Turn off AI. From now on, answers come only from your approved library.
Intellinaire, the assistant
Intellinaire is the assistant built into the app. It answers questions about the app and your work, prepares changes for you to approve, and helps with anything else, such as writing, analysis or code. It uses the model you set up on the AI drafting page, on your computer or in the cloud.
- Set up a model on the AI drafting page. See AI on your computer or AI with a cloud service.
- Open Chat under Intellinaire in the menu, or click Ask Intellinaire near the bottom of the menu on any page. You can also press Ctrl, Shift and I.
- Type a question in the message box and press Enter. Press Shift and Enter for a new line.
- Each step Intellinaire takes, such as reading the review list or searching your library, is listed above its reply. Click a step to see what it read.
- Ask a follow-up question in the same conversation. Intellinaire keeps the context of the whole conversation.
- To stop a reply, click the red stop button. Point at a reply to copy it or have it written again. Point at your own message to edit it and send it again.
Intellinaire knows which page you came from and which question you had selected on the Review page, so a question such as "Improve this answer" refers to that question.
The circle next to the model name shows how much of the model's memory the conversation uses. When it fills up, older messages are summarized automatically, so long conversations keep their context.
Changes and approvals
Intellinaire can prepare these changes: a new answer for a question in the review, a new or updated answer in your library, guard terms, settings such as the company name or appearance, and tasks such as running the sample company or building the trust pack. It never makes a change by itself.
- Ask for the change, for example "Improve the answer to Q12 using only approved evidence" or "Add Salesforce to the guard terms".
- A Proposed change card appears in the reply. For an answer, it shows the new wording marked against the current answer and the claim guard's verdict.
- Click Approve to apply the change, or Reject to leave everything as it is.
- The card then shows what was done. For an answer edit, export the final file from the Review page to write it to the buyer's file.
Library changes work with CSV libraries. Before a library file is changed, the previous version is saved beside it with the date and time in its name.
Files, images and web search
- To attach a file, click the paperclip button, drag the file onto the chat, or paste it. Excel, Word, PDF, CSV, text and code files up to 8 MB can be attached.
- To attach an image, click the picture button, drag it in, or paste a screenshot. Models that accept images can read it.
- To let Intellinaire search the web for one message, click Search the web before you send. Sources it used are listed under the reply. Click one to open it in your browser.
- For full web results, open Chat settings (the button at the top right of the chat) and add a Brave Search or Tavily API key. Without a key, a basic search is used. Claude models use their own web search.
With a cloud model, the app asks once for your permission before the first message. Your messages, attached files and the app details Intellinaire reads are then sent to that service. You can withdraw the permission in Chat settings. API keys are never sent to a model.
Manage conversations
- Click New chat at the top of the conversation list, or press Ctrl, Shift and O.
- Conversations are grouped by date: Today, Yesterday, Previous 7 days, Previous 30 days and Older. The date and time of the last message is shown under each title.
- Type in Search conversations to find one by its title or last message.
- Point at a conversation and click the three dots to Rename it, Pin it to the top, Copy as Markdown, or Delete it. Delete asks you to confirm.
- To use a different model for one conversation, click the model name at the top right and choose another. Models are set up on the AI drafting page.
Conversations and attached files are stored on your computer only, in the chats folder inside the settings folder.
While the model writes, the video plays at five times normal speed and says so on screen.
More
Command line
Every task is also available as a command, for scripts and scheduled jobs. The command line is part of the installed app and uses the same license, so activate the app first.
- Open a terminal. On Windows, open a new Command Prompt or PowerShell window after installing; the installer adds
qato your path. - Run
qa self-testto confirm everything works. On Linux, usequestionnaire-autopilotin place ofqaafter installing the.deb, or the path of the AppImage file. - Run the command for the task you need, from the table below. Each command writes its results to the folder given after
--out.
| Command | What it does |
|---|---|
qa self-test | Runs the 22 built-in checks. |
qa demo | Runs the fictional sample company. |
qa init-library my_answers.csv | Creates a library from the template. |
qa check-library my_answers.csv | Checks library health. |
qa import-history done.xlsx --out approval_candidates.csv | Recovers answers from a completed questionnaire. |
qa run incoming.xlsx --library my_answers.csv --out out/acme | Answers a questionnaire. Add --provider and --model for AI drafting, and --allow-cloud for a cloud service. |
qa check-final final.xlsx --library my_answers.csv --out out/check | Checks the final file. Exits with code 3 while anything is at risk. |
qa build-trust-pack --library my_answers.csv --company "Your Company" --out trust-pack | Builds a customer trust pack. |
qa license status | Shows the license of this computer. qa license activate KEY activates it, qa license deactivate releases it. |
The video shows these commands with the output they printed when run on the sample files.
Troubleshooting
- The app shows "Part of the app was blocked from loading". An ad blocker or web filter, such as AdGuard, is filtering the app's local connection. In that program, allow
127.0.0.1or add Questionnaire Autopilot to its exclusions, then reopen the app. - Windows shows "Windows protected your PC". Click More info, then Run anyway. This appears once.
- The AppImage does not start on Linux. Install the
libfuse2package (libfuse2t64on Ubuntu 24.04 and later), or use the.debfile. - Activation says the key is already active on three computers. Deactivate one of them under License, or email contactprautof@gmail.com if that computer is no longer available.
- The app asks to confirm the license. It has not reached the license service for 30 days, or the computer's date was changed. Connect to the internet, open License and click Check now.
- Test connection fails for a local model. Make sure the model server is running and that the address in the app matches its port.
- A question you expected to match is Needs evidence. Add the buyer's wording to the
keywordscolumn of the matching library row, or add a new approved answer. - Anything else. Email contactprautof@gmail.com with your operating system and what you saw. If we cannot make the app work on your computer, you get a refund within 14 days of purchase.